This is the first post in my 5 part blog series: The Complete Handstand Guide for Beginners. You can find the introduction and more information here by clicking here.
Learning to do a solid handstand is all about having the foundations for handstand in place first. That starts with building the foundational strength and flexibility/mobility necessary to do a straight handstand.
The reason I emphasize this is because flinging all of your body weight on top of your wrists before they’re strong or flexible enough to handle it… I don’t know how you feel about that, but to me that doesn’t sound like the best idea.
The same thing goes for the rest of your body. Your body will really thank you, if you take the time to prepare it just a little bit, before flinging yourself into handstands repeatedly.
If you know that you are strong and mobile enough to start handstanding right away, feel free to skip this post. You can head straight to the next post in my complete handstand guide series by clicking here.
Building foundational strength and flexibility first
In my experience, creating foundational strength and flexibility before beginning to practice balancing in a handstand will save you so much struggle and frustration. Making the body prepped and ready for the movement you want to achieve will make things a lot easier for you.
That said (!), I’m not promising learning the handstand will be completely without a little struggle, fear, and frustration (because it very likely will sometimes 😛 ). I hope you’re ready to commit to a consistent handstand practice, because it will take a lot of time and effort to see results!
I’m absolutely sure you can get there if you put in the work. Now let’s get to it!

Handstand foundations
You get it, mastering the foundations first will make balancing in handstand so much easier and more sustainable for your body in the long run.
‘So which foundations do I need to build to be able to do a handstand?’
Handstand stability is all about having strong and mobile (flexible) shoulders. The wrists also need to have a good amount of strength and mobility. Core strength helps some too – but unlike what most people think, having stability in a handstand is primarily all about making sure our shoulders and wrists are strong and mobile and actually not that much about core strength at all.
So let’s start from the bottom up!

Wrists
Why you need wrist strength
Wrist strength is one of the key foundations for handstand. If you want to start handstanding, your wrists need to be strong enough to support and carry ALL of our body weight. Bearing weight on the hands doesn’t come naturally to us. We need to slowly and consistently build up the strength to do so in all of the tissues of our wrists and hands (muscles, ligaments, tendons, bones, nerves, and fascia).
That means, if you’re not used to bearing weight on your hands at all, it’s probably a good idea to work on wrist strength every 2-3 days to build strength slowly and sustainably whilst allowing enough time in between to recover fully.
If you’re used to some weight bearing on your hands from doing sun salutations in yoga, lifting weights, or anything where you put a decent amount of weight on your wrists, your body might be ready to do these exercises daily, or to simply use them as a warm-up before you practice handstands.
Why you need wrist flexibility
Wrist flexibility is one of the key foundations for handstand. In a straight handstand the wrists need to be able to bend to (or past) 90 degrees, so if they aren’t already able to do that, you need to work on your wrist flexibility too. If your shoulders are not able to open up 180 degrees you will have to lean the shoulders past the wrists when doing handstands and that will require even more flexibility in your wrists.
Bottom line: work on getting those wrists flexible too! You wouldn’t want to force your wrists into a deep stretch with your whole body weight on them if they’re not flexible enough to enter the stretch without any weight on them, would you?
Tired of dealing with aching wrists in your handstand practice?
Get The Complete Wrist Guide so you can practice yoga, arm balances, and handstands with ease and stability!
The ebook includes 17 exercises that build strength and flexibility in your wrists and forearms, two exercise program templates, and a printable wrist exercise sheet, along with tips on how to position your hands and distribute weight in your palms for optimal comfort and balance.
Wrist exercises and drills
Here’s a couple of exercises which will help you get used to bear more weight on your hands & wrists and help you get those wrists flexible enough to do a handstand:
Wrist push-ups
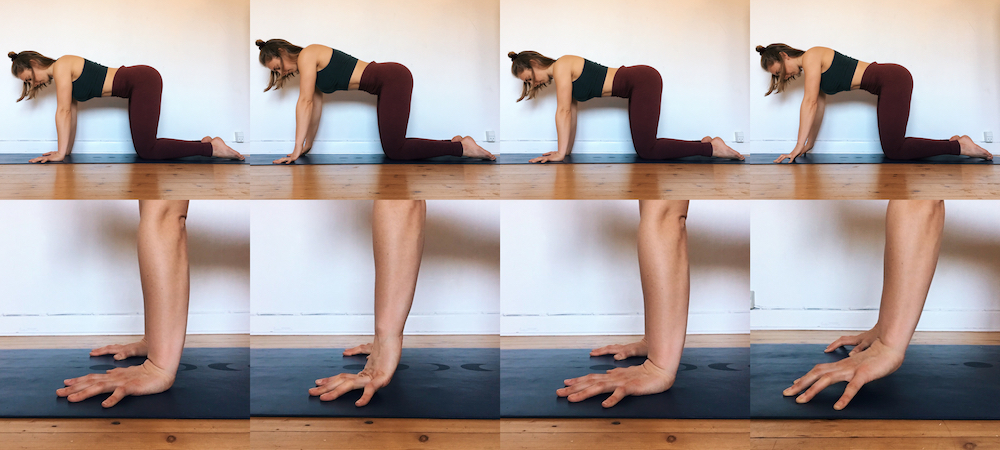
For this exercise you want to come to all fours. Stacking hips roughly over knees and shoulders roughly over wrists. Place your hands on the floor so your index fingers are parallel and pointing straight forwards.
- Spread your fingers and grip the floor with your hand so the entire palm is touching the ground.
- Push into your fingers to lift the palm of your hand off the floor, keeping the fingers grounded.
- Sink your palm into the ground again.
- This time push into your fingers to lift the palm of your hand and most off your fingers from the ground, so only the tips of your fingers are touching the ground.
- Repeat.
If this exercise feels super hard, try sending your hips and shoulders back a little to lean some of the weight out of your hands. Then try again. If you practice, eventually you will be able to do this exercise with your shoulders stacked directly over your palms.
Flicking the water drill
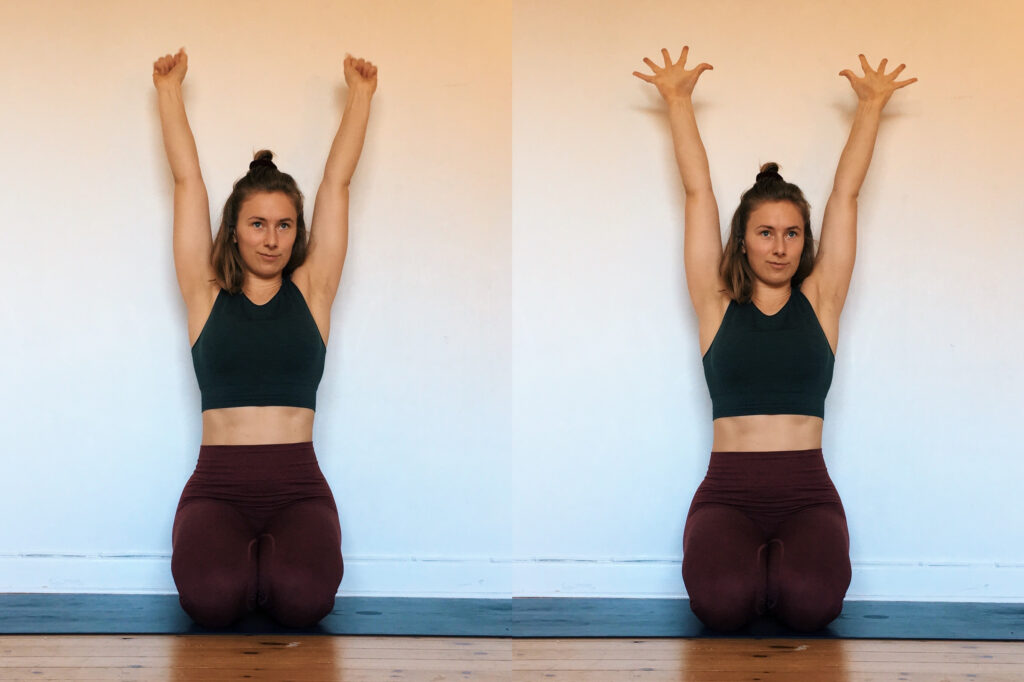
For this drill you want to sit comfortably with a straight back. I prefer to sit on my shins.
Bring your arms overhead and close your palm tightly into fists. Then open your palms and stretch your fingers wide like you’re trying to flick water off your hands. Then close your hands into fists again and repeat. See if you can start picking up the pace going between these to hand positions.
I like to set a timer to 1 minute and do this as quickly as I can for the whole minute. Try it out and I promise you will feel your forearms igniting!
Wrist extension
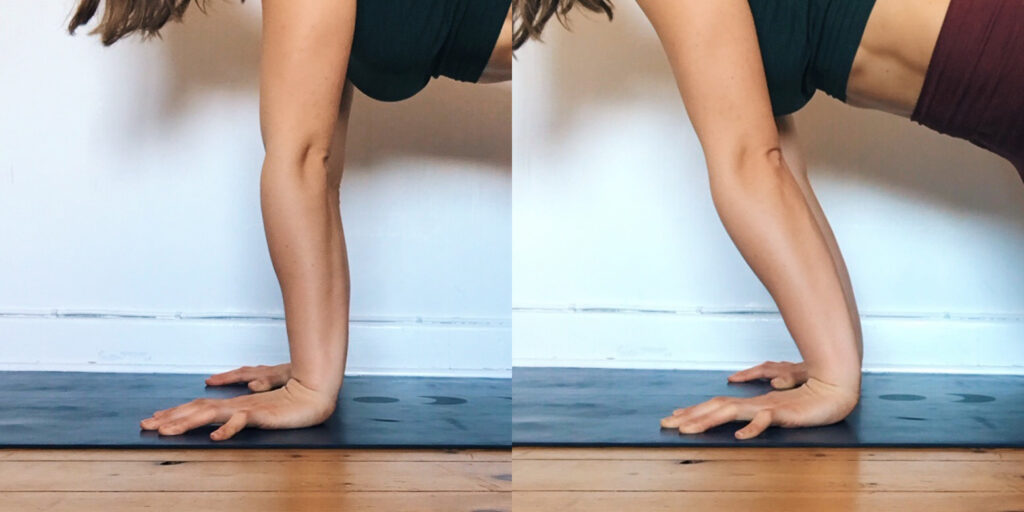
For this exercise, you want to start on all fours. Spread your fingers widely, ground your palms into the floor right below your shoulders, and rotate your hands so your index fingers become parallel.
From here, see if you can really activate your entire palm by actively pressing the back of your index finger knuckle into the ground. Activate all 10 fingers too by imagining you’re trying to grip the floor.
Holding all of that activation in the hand, keep the elbows straight as you inhale and start leaning the shoulders forward past your wrists. Only go as far as feels comfortable to you!
On your exhale, come back to neutral.
Inhale, lean the shoulders forward. Exhale, come back to neutral. I recommend repeating 10x and holding for 10 seconds in your maximum wrist extension on the last repetition.
Eventually with practice you will build up the strength and flexibility to go even deeper into wrist extension.
Wrist extension w. fingers pointing backward
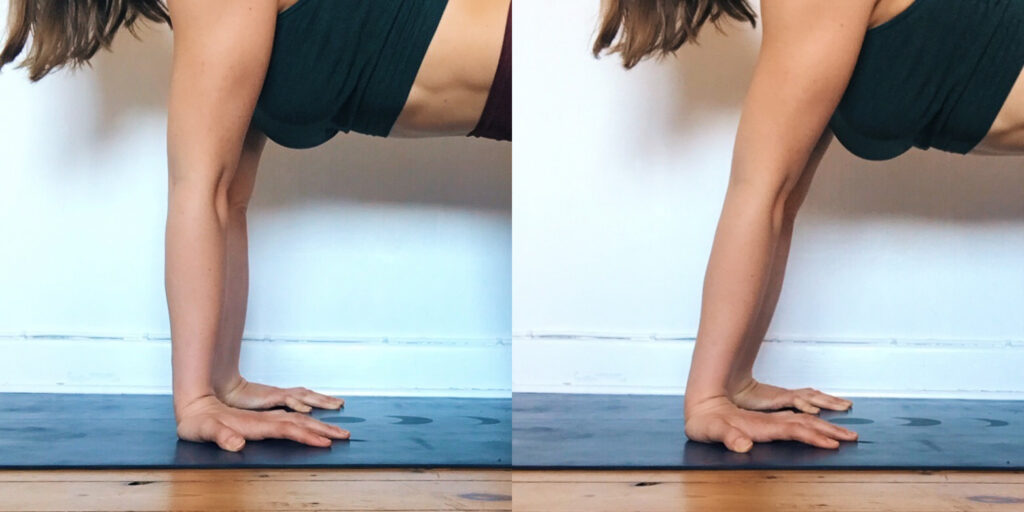
Again, you want to start on all fours with your fingers spread widely and palms grounded into the floor below shoulders.
From here, rotate your fingers outwards and keep rotating until the fingers are pointing back towards your knees.
Ground your entire palms. As you inhale, start leaning the shoulders backwards. You’ll quickly start feeling a stretch in your forearms. Stop leaning back when the intensity of the stretch is enough for you.
On your exhale, come back to neutral.
Inhale, lean the shoulders back. Exhale, come back to neutral. I recommend repeating 10x and holding for 10 seconds in your maximum wrist extension on the last repetition.
Wrist circles

Starting on all fours again, rotate your palms so the fingers on each hand are pointing out to the side (fingers on right hand facing the right side, and fingers on left hand facing the left side).
Keep the elbows straight as you start leaning your shoulders forward. Then start a circle like motion with your shoulders, leaning them out to the right, then backwards, then left, then forwards again.
Do 10 circles in one direction and then 10 the opposite direction. This one really warms up and mobilizes the wrists so they’re ready for handstanding!
Wrist flexion
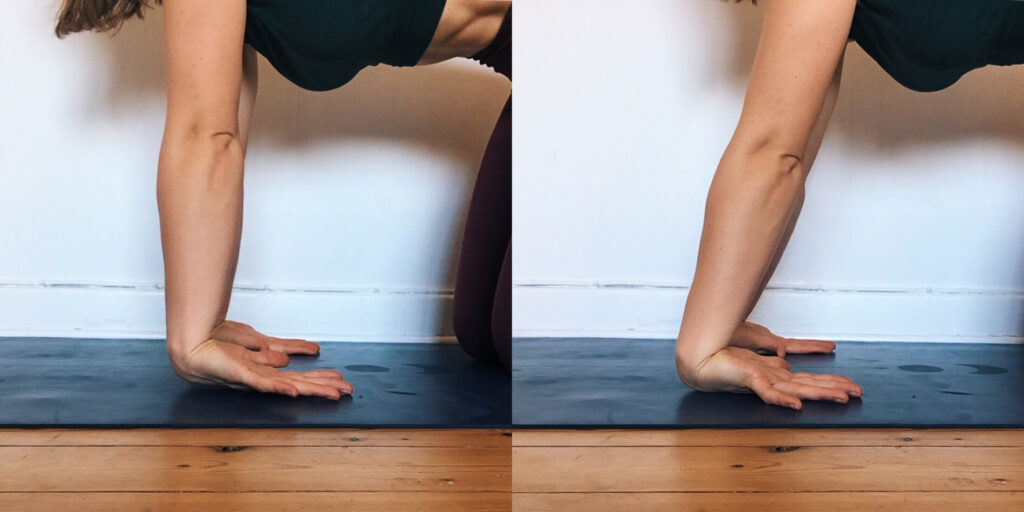
Again, you want to start on all fours with your fingers spread widely. Flip your palms so that the top of your hands are onto the ground with your fingers pointing back towards your knees.
As you inhale, start leaning the shoulders backwards. You’ll quickly start feeling a stretch on the top of your wrists. Stop leaning back when the intensity of the stretch is enough for you.
On your exhale, come back to neutral.
Inhale, lean the shoulders back. Exhale, come back to neutral. Repeat 10x and hold for 10 seconds in your maximum wrist flexion on the last repetition.
Rolling off the wrist
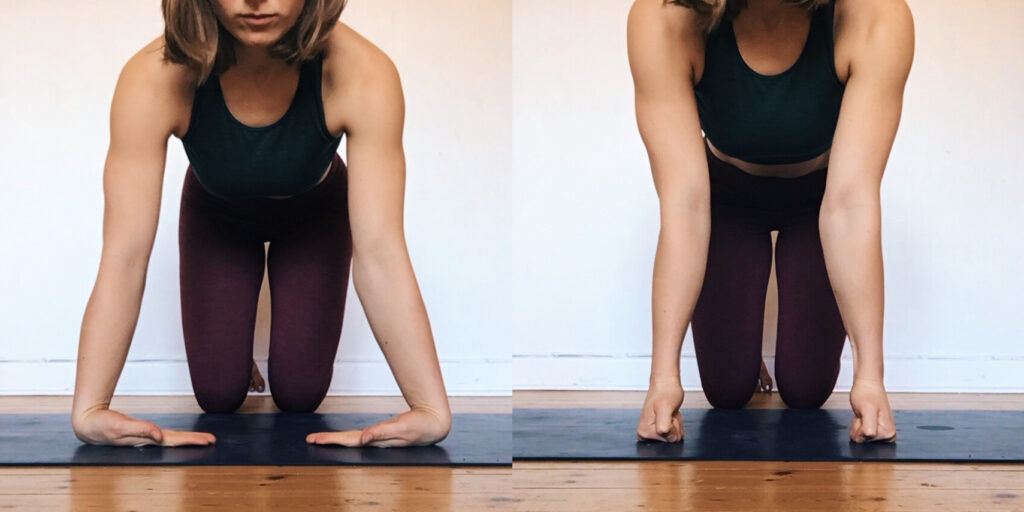
For this exercise you want to start by placing the tops of your hands on the floor so your fingers are pointing inwards. See if you can place the hands so they’re roughly below your shoulders and keep your elbows straight.
Now close your hands into fists as you roll onto the top of your knuckles. See if you can really use the strength of your hands and forearms to lift the tops of your palms off the floor. Avoid compensating by sending your hips back towards your heals to pull you up onto your knuckles.
Next, open your palms again as you lower the top of your hand down to the floor again.
Repeat 10 times.

Shoulders
Why you need shoulder strength
Shoulder strength is one of the key foundations for handstand. Just like the wrists, the shoulders need to be able to carry most of your bodyweight when you’re in a handstand shape. To do that they need to be (duh!) strong.
Your shoulders also play a huge part in finding and creating that balance and stability in the handstand once you’re ready to leave the wall behind and work on finding balance in a freestanding handstand. Being able to really push out of the shoulders and keep them engaged and locked at 180 degrees is what’s going to help find stability in a freestanding handstand.
Why you need shoulder flexibility
Shoulder flexibility is one of the key foundations for handstand. Like I mentioned earlier, if your goal is that perfectly straight handstand your shoulders will want to be able to open up to 180 degrees.
It is super common not to have the required flexibility in the shoulders to do that, when you’re first starting out on your handstand journey. If you start handstanding before you have a sufficient amount of shoulder flexibility, you will have to compensate by bending into your back to find balance.
That compensation in itself isn’t super dangerous if you have the strength and stability in your back to support and handle doing arched back handstands (also known as banana shaped handstands). I do recommend practicing shoulder mobility to eventually be able to stack your shoulders over your wrists in handstands – it’s way more efficient! If your back ever starts hurting from doing handstands, I would advice you to take a break from handstands for a while and work on achieving that foundational mobility in your shoulders before you start practicing handstand again. That way you no longer have to compensate for lack of shoulder mobility by bending into your back and therefore you can prevent straining or injuring your back.
Shoulder exercises and drills
Shoulder shrugs on all fours, in downdog, or in plank.

Start on all fours with your shoulders stacked on top of your wrists. From here imagine you want to push the ground away. Lift actively up and out of the shoulders and spread your shoulder blades (protraction).
Then slowly collect the shoulder blades on your back again (retraction) and let your upper body sink down again.
Repeat this shrug like motion 10 times to build awareness in your shoulders and around the shoulder blades. Once you start handstanding this motion of really pushing out of the shoulder to create a lift is going to help you.
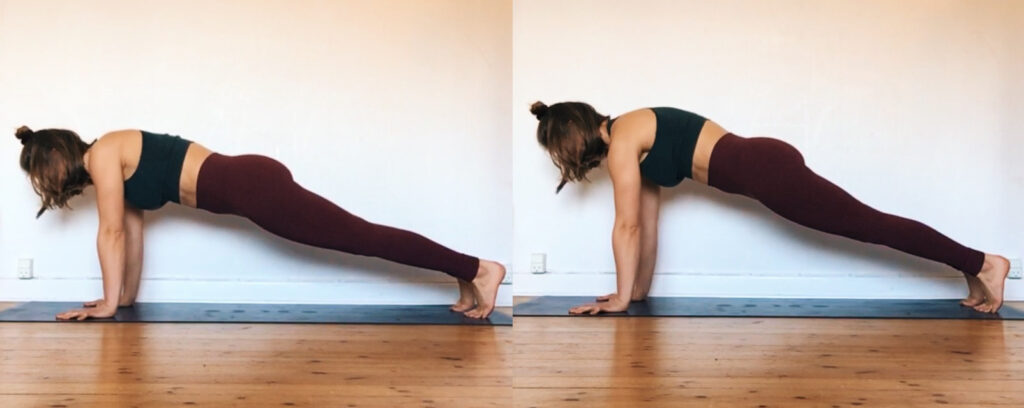
Similiarly, these shrug like motions can be done in plank as well. This is going to be a bit harder than doing it on all fours.
Feel free to step the intensity up or down by choosing the variation that helps you where you’re at at the moment!
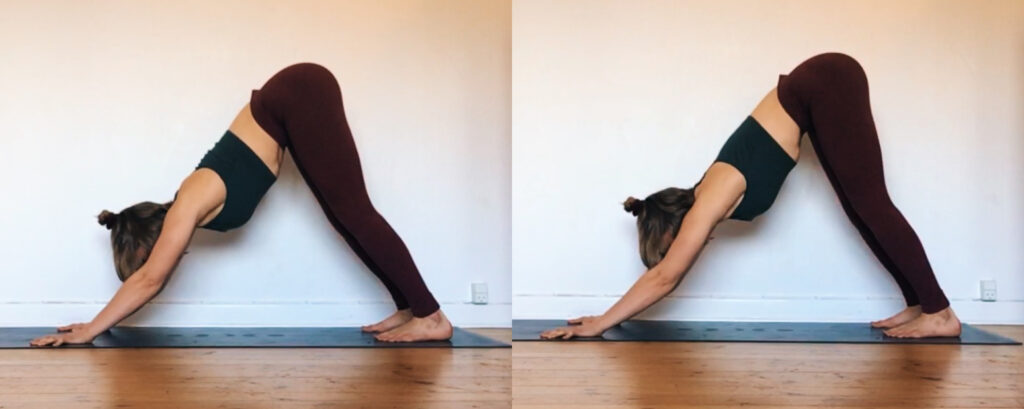
These shoulder shrugs can also be applied to a downward facing dog. What’s really good about doing them in this pose is that the arms are extended overhead like in handstand, so the sensation is going to be very similar to what you want to eventually be doing in handstands.
It’s a very small movement and might be hard to see from the pictures above. But see if you can get that sensation of really pushing the ground away so hard that your shoulders lengthen out of the shoulder socket and your shoulderblades elevate towards your ears.
Then release and let yourself sink into the shoulder again. Repeat 10-20 times and hold for 10 seconds at the last repetition in full scapula elevation, pushing the ground away as hard as you can.
Dolphin pose to dolphin plank drill

Starting in a downward facing dog, lower your forearms to the ground but keep your hips reaching up and back, finding a dolphin pose.
If the back of your legs feel an intense stretch here, bend your knees so that you can focus on pushing your armpits towards your knees to really open up and stretch into your shoulders. Push into your forearms to actively elevate your shoulder-blades towards your ears.

From here start walking your feet backwards and lower your hips to come into dolphin plank pose.
From dolphin pose push out of your shoulders to lift away from the ground. Then sink into your shoulders again. Yet again in this shrug like motion. Repeat 10 times, holding for 10 seconds at the top.
Shoulder openers
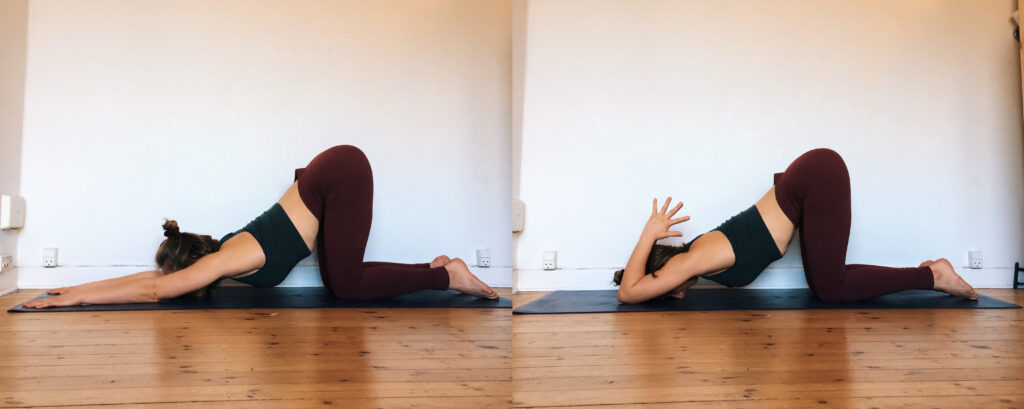
From all fours, keep your hips stacked on top of your knees as you walk your hands forward. Let your chest sink down towards the ground. Let your forehead or your chin rest on the ground.
You should be able to feel a stretch in your shoulders and chest. For less intensity place a block or a pillow below your chest. If you want a deeper stretch you can place a block or book under each of your hands.
From here bend your elbow and collect your palms as you reach them back towards the back of your neck. You should be able to feel a stretch in your shoulders and your upper arm as well.
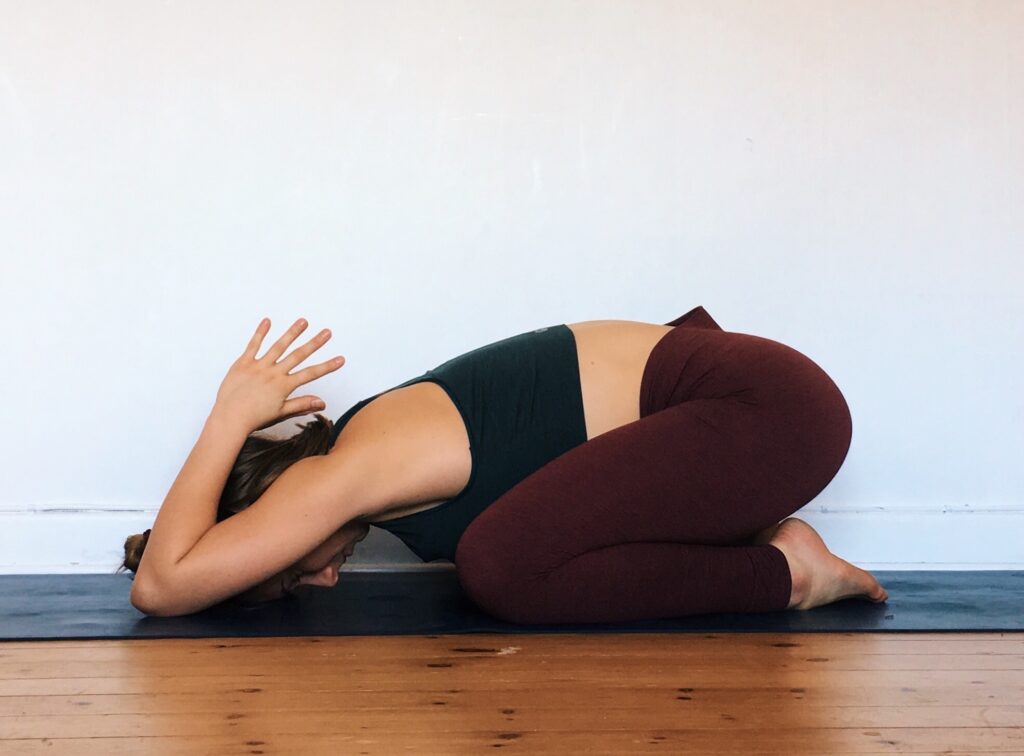
If puppy pose feels way too intense for you at the moment, find child’s pose instead. Spread your knees wider than hip width so your belly can sink down between your thighs.
Stretch your arms out in front of you, collect your palms, and bend at the elbows sending your hands towards the back of your neck.
Yet again, you can intensify the stretch by placing a block beneath each elbow.
Core
Why you need core strength
If you want to achieve that perfectly straight handstand line one day, building the core strength to hold that hollow body shape for a decent amount of time is going to help you loads.
Core strength is also great for keeping the ribs and lower belly tucked in, so that your whole handstand practice becomes less about flailing like a fish out of water to stay balanced and more about keeping the straight line and only micro adjusting to stay in the handstand.
Core exercises and drills
Warrior 3
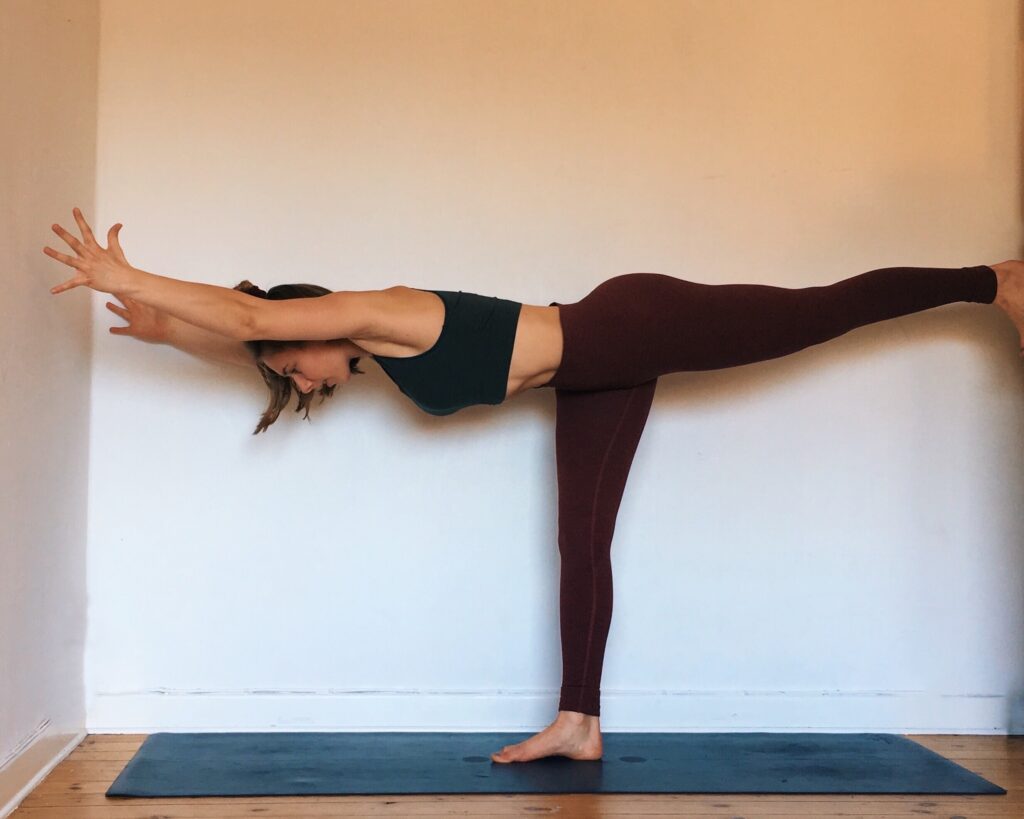
Warrior 3 is great for learning how to keep your whole body in approximately one line.
From standing start to send your upper body forward as you kick back with one leg. Find a focal point on the ground to keep your gaze on to help you balance here. Bend the standing leg a little if you find it hard to balance in warrior 3 today.
See if you can knit the ribs in and let your belly button seek up towards your spine to keep the core engaged and tight.
Reach backwards with the heel of your foot as though your are trying to kick the wall behind you. Make sure your hips are level and reach your arms overhead.
See if you can keep this shape 20-60 seconds with the core super engaged.
One legged plank drill
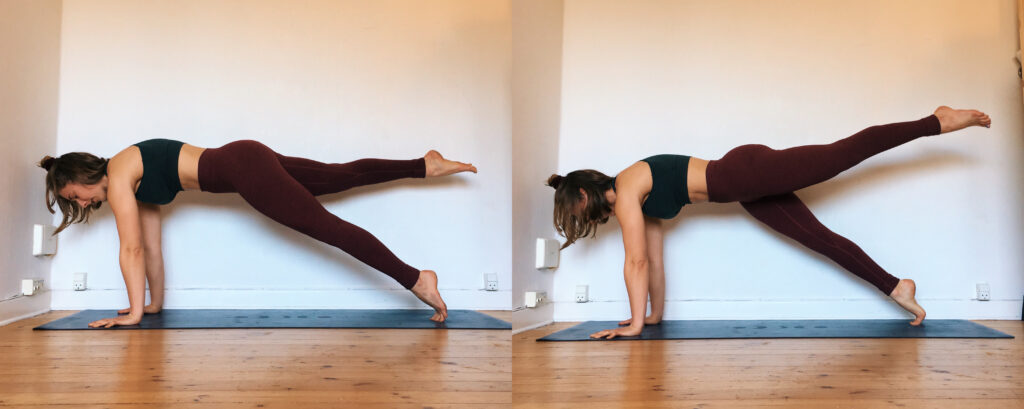
Come into plank pose.
Engage the palm of your hand and your fingers to prevent all the weight from going into your wrists.
Suck belly button to spine, knit your ribs in, and lean forward to stack your shoulders on top of your palms.
Now lift one leg up, holding the core tight. Lower the leg down again. Next time lift the opposite leg of the ground.
Lift each leg 20 times and hold the leg lifted for 10 seconds on the last repetition on each side.
Chaturanga
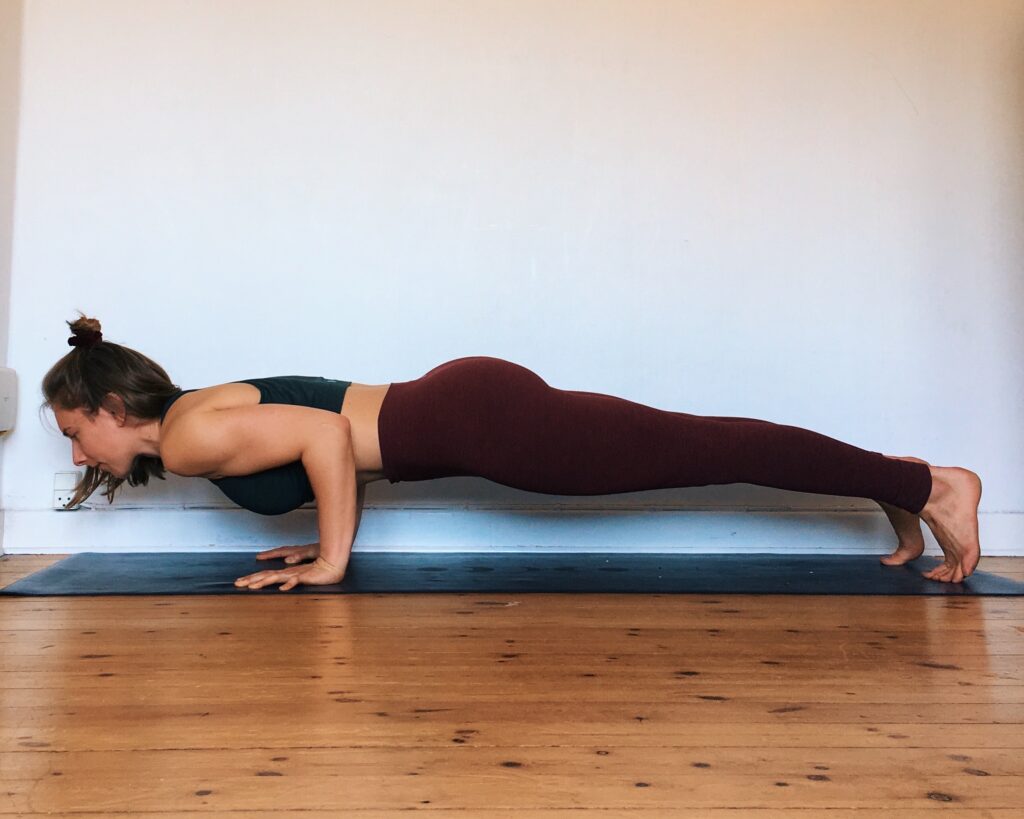
From plank pose, lean the weight forward into your hands (high plank) and start bending at the elbows until they’re bent to 90 degrees.
Widen your collar bone, keep belly button to spine and knit the ribs in. This shape is great at strengthening your core as well as legs, arms, and shoulders.
Lower from plank for 5 seconds and build up to hold chaturanga for 10 seconds.
Boat pose & hollowbody holds

From sitting on the ground with your knees bent and hip width distance apart, lift your hands out in front of you. Lift up your legs too and keep the knees bent so the shins can be parallel to the floor – boat pose.
Keep your upper body straight by elongating your lower back and engaging the abdominals by sucking your belly to your spine.
Hold here for anywhere from 5-60 seconds.
If this feels manageable, you can increase the difficulty be straightening out your legs.
Increase further by lowering legs and upper body toward the ground.
Increase even further by reaching your arms overhead going in to a full hollowbody shape.
Hold for 10-60 seconds.
Legs & Hips
Why you need leg & hip strength
This one isn’t super essential for balancing in a handstand. But being able to really tuck the pelvis and squeeze the legs together is that last little cherry on top of the icing on the cake that accomplishes the straight line handstand shape.
Why you need leg & hip flexibility
Again, not super important for beginners, but working on leg & hip flexibility is going to help you get a deeper forward fold, which is very helpful when you want to start entering a handstand by folding over to kick up into it.
It’s also essential to gain hip & leg (hamstring) flexibility if you’re dreaming about pressing into a handstand one day!
I’m going to show you just a couple of exercises and drills to help you with this. But know that primary focus if you want to have a solid handstand is to make sure your wrists and shoulders are good to go!
Leg & hip stretches
Forward fold
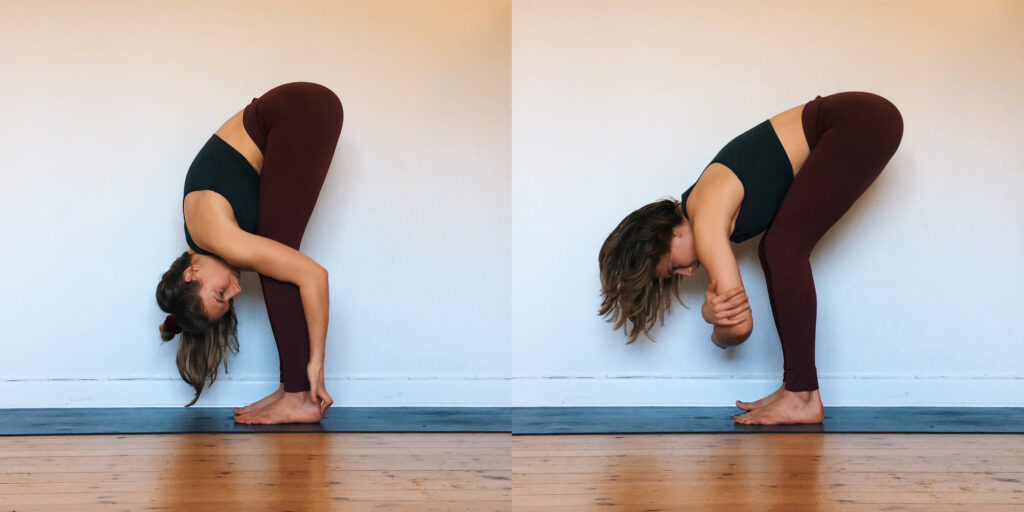
Stand with your feet hip width distance apart. Fold your torso over your legs. You can place your hands on the back of your legs, on the ground, or anywhere that feels comfortable to you.
If you are quite far from reaching the ground, bend your knees and keep your spine elongated. This way you will still feel a stretch on the back of your legs but you will avoid rounding into your upper back and feeling the stretch there instead.
Standing hand-to-big-toe

From standing, bend one leg and lift it towards your chest. Grab your big toe with your index and middle finger and start straightening your leg out in front of you. Keep your torso upright and your arm pulling back into the shoulder socket.
If you want to add some hip opening you can start to bring the leg out to the side.
Hold for 10-60 seconds in each pose.
High lunge
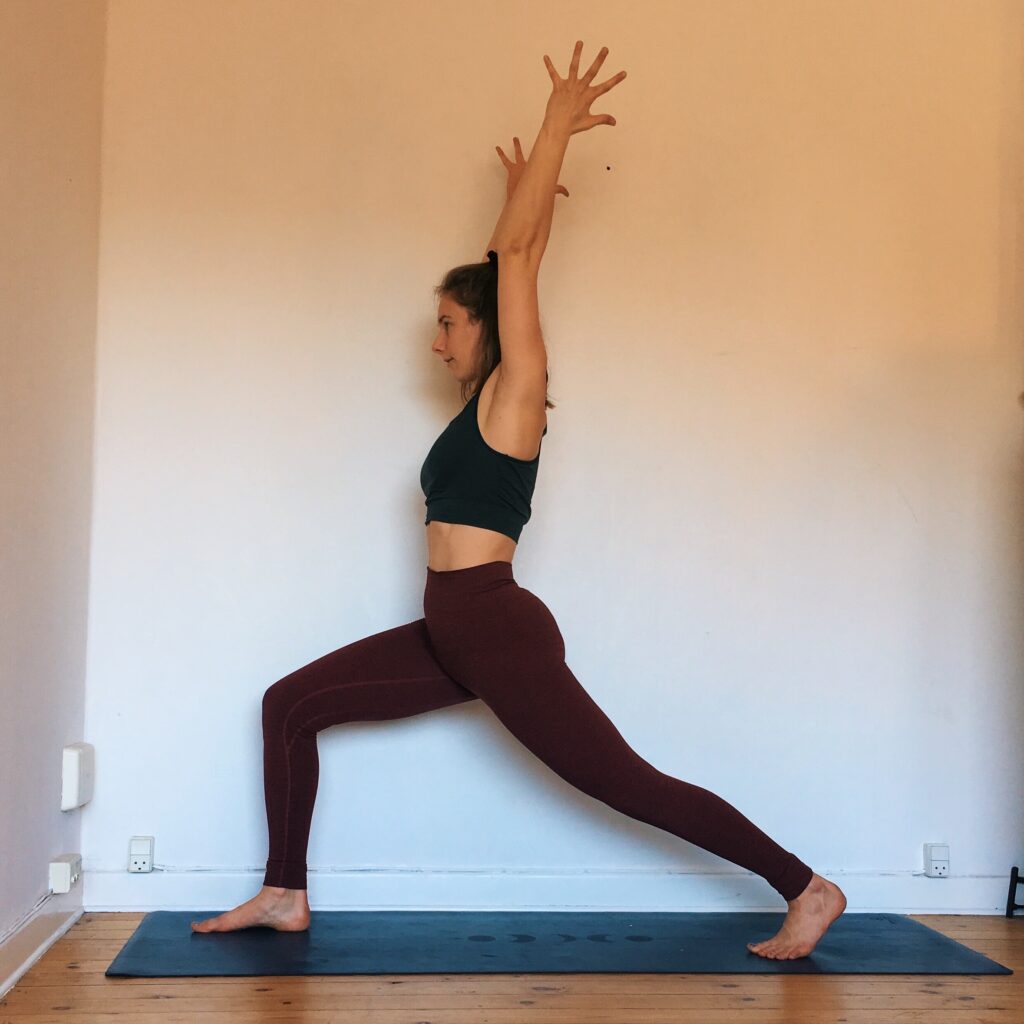
From standing, step far back with your left foot and bend your right knee to 90 degrees.
You want to be able to feel a stretch on the front of your hip on the left side. If you suspect that you are arching your lower back, see if you can elongate it by tucking your tailbone under. This should increase the stretch you feel in your hip flexor.
Hold for 10-60 seconds.
Goddess pose
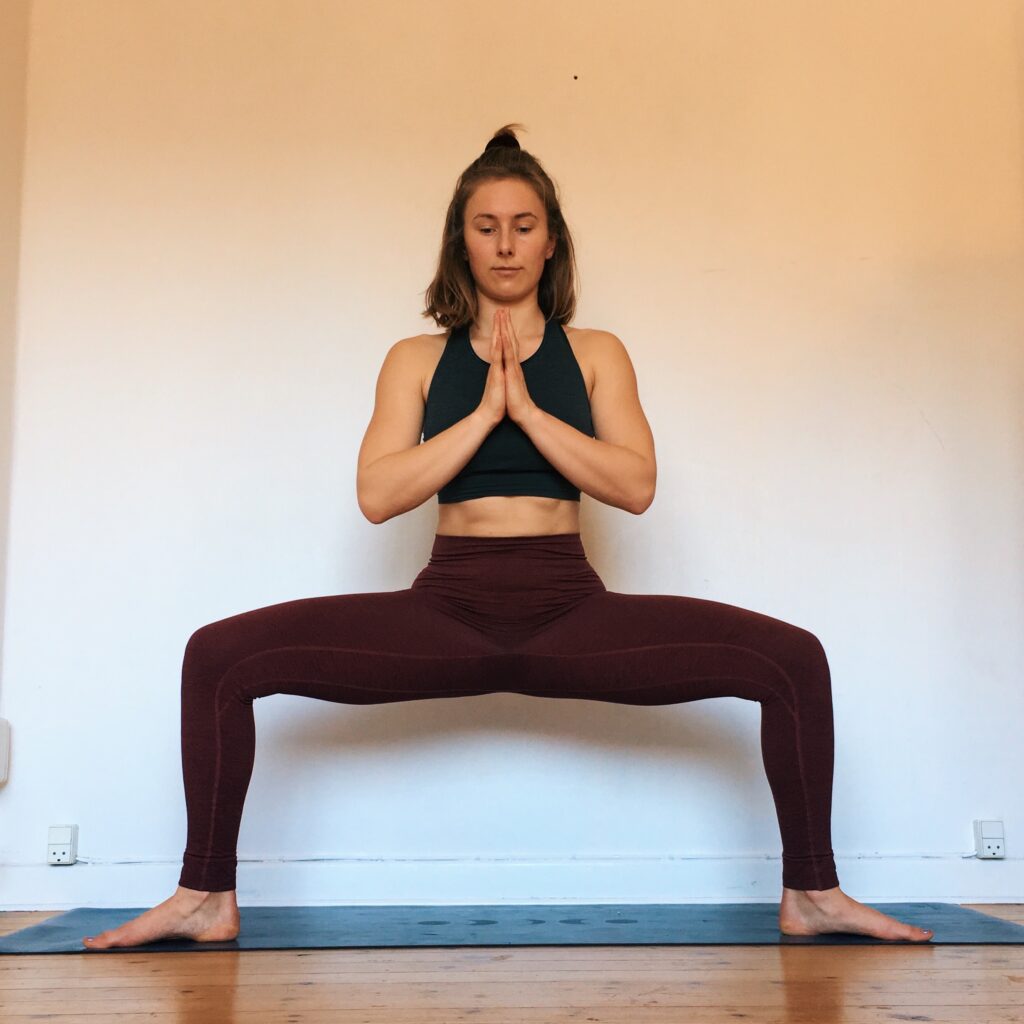
From standing step your feet further apart coming into a wide squat position. Make sure your knees and your toes are pointing out in the same direction.
Sink your hips down in a squat like motion and keep your knees searching backward.
Then come up again by straigthening out your legs.
Do 10-30 wide stance squats and hold for 10 seconds in the full squat position on the last repetition.
Pigeon pose
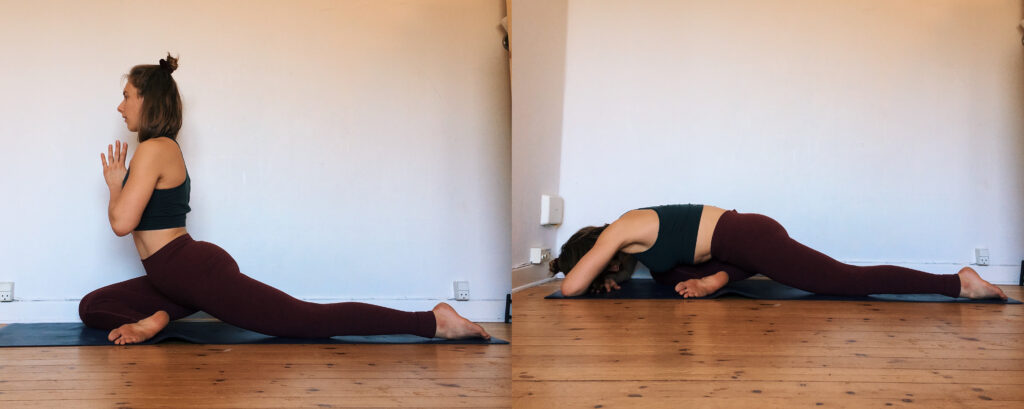
Last exercise!
From all fours bring your right knee to touch your right wrist. Keep your right thigh pointing straight forward and move your right foot forward until it’s just in front of your left hip.
Slide your left leg toward the back of your mat and lower both hips toward the floor. Make sure your hips don’t spill to the right side and that your left leg is extended straight.
From pigeon pose, activate your legs by sucking them into toward one another. Hold here for 10-30 seconds.
Come into a restorative variation of pigeon pose by walking your upper body forward, relaxing it down onto the ground, block, or on a pillow. Release your neck, letting the head rest down into the ground or onto a block too.
I’m amazed if you made it this far! I’m super excited to be sharing the rest of the complete handstand guide with you.
Comment below with any questions or feedback! I’d love to know how your handstand practice is going! Which was your favourite exercise from this pose, which really helped you?
When you feel like you’ve got the foundations for handstand in place, move on to the next post in my complete handstand guide series to start learning how to find the handstand shape.
Wishing you lots of luck on your handstand journey yet again,
xox
Cami

Your website is so cute and helpful I love it! How long did it take you to achieve a steady handstand?
Hi Abbey! Thank you so much for the kind words.
It took me about 1 year before I could balance longer than just 5 wobbly seconds ☺️ I’d done a lot of yoga before starting my handstand practice, so that helped me progress lots.
Wow! The most detailed and helpfull guide I have ever found. I’m definitely going to incorporate this is my path to doing a proper handstand (something I’m dreaming about for years now). Thanks a lot!
Thank you so much! It means lots to me that you find it valuable. Best of luck on your handstand journey. I’m rooting for you! 🙂
Thank you for your detailed instructions. They don’t looked rushed and offer a lot of modifications along the way. I’m looking forward to practicing and growing into a handstand. ♀️
Thanks so much for the kind words. I’m glad you found it useful!
Very nice, and helpful