This post is part of my series: The Complete Handstand Guide for Beginners. If you missed the introduction you can read it here and use the buttons below to navigate between the posts in the series.
Now we’ve got the foundations down from the previous post of this handstand series.
It’s time to talk about finding the handstand shape and alignment to create the most efficient and sustainable handstand practice for you in the long run!
This part of the handstand journey takes time! You will need to practice optimal handstand alignment over and over. Do hollowbody drills so many times it becomes second nature and gets built into your muscle memory.
It’s like learning to walk when you were a kid. Practice a little bit every day and your body will understand the movement faster.
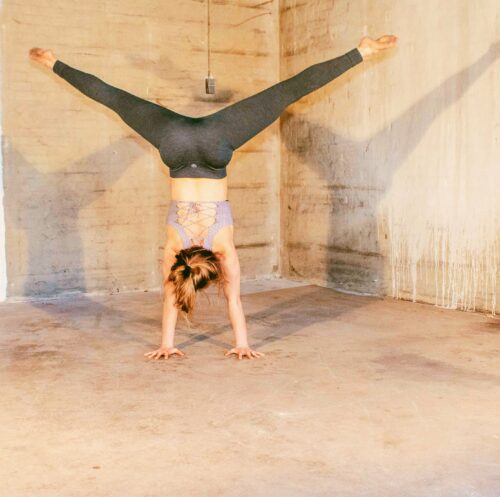
Let’s dive into optimal handstand alignment starting from the bottom going up!
Hands & Wrists
Why hand placement and engagement is SO important in handstands
Our hands are the entire foundation of balance when we’re handbalancing! So how we place them and how we engage our palms is so so important because it lays the entire foundation for our ability to balance!
In my experience, there’s a lot of different opinions on this topic so I will be sharing what I find most efficient and helpful. Keep in mind that there isn’t just one right way to do these things, so I absolutely encourage you to experiment with these things to find what works best for you!
So let’s dive down and geek out on this topic for a moment.
Hand-to-hand distance in handstand
For a straight handstand you want to place your hands roughly shoulder distance apart on the floor.
There are some mixed opinions on this one out there – debating whether a wide grip is better than a stacked grip. From what I’ve learned, all of the small stabiliser muscles of the shoulders and arms need to work a lot harder to let us balance, when we’re not in a bone-stacked position. Therefore I definitely recommend placing the hands in a shoulder width grip to find the most efficient position as possible.
Now placing hands in a stacked position overhead might be impossible for you at the moment, if your shoulder mobility still has some way to go. Place your hands a bit wider if shoulder distance feels too tight for now or if it feels better to you.
Either way, I recommend continuing to work on shoulder mobility until you can try out both hand positions for yourself, to feel which one is best for you.
Rotation of hands in handstand
Next you want to consider the rotation of your hands.
For me, I like to align my hands so that my pointer fingers are parallel.
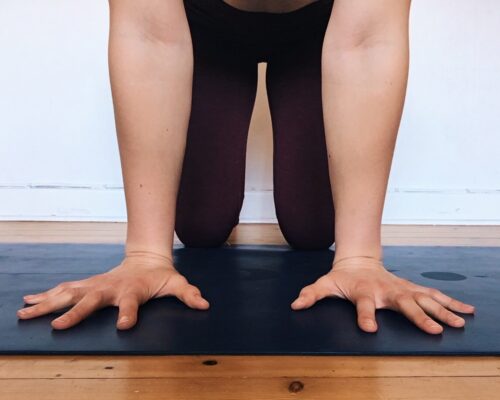
That hand positioning helps maintain an external rotation of the shoulders in handstands (which helps with balance and helps get the right shoulder engagement to prevent us from sinking into the shoulder joint).
I’ve seen people balancing handstands with their middle fingers parallel too or even rotating them out further so the pointer fingers are pointing diagonally away from each other.
Try out a hand placement for yourself and notice what feels best.
Did you imagine it would take us this long just to go through how to place your hands on the ground?!?
I warned you we were going to fully geek out on this 😉
Hope you’re still with me! 🙂
Now you’ve placed your hands in the best, most efficient way on the ground. BUT, we’re actually still not done talking about hands..
The engagement of your hands and fingers will determine how your weight is distributed into your palms when you handstand. This is actually super important because the right engagement will not only help you find much more control and stability in your handstands, it will also protect your wrists from having to passively carry all of your weight (which does not make for happy wrists)!
Tired of dealing with aching wrists in your handstand practice?
Get The Complete Wrist Guide so you can practice yoga, arm balances, and handstands with ease and stability!
The ebook includes 17 exercises that build strength and flexibility in your wrists and forearms, two exercise program templates, and a printable wrist exercise sheet, along with tips on how to position your hands and distribute weight in your palms for optimal comfort and balance.
Weight distribution in palms
In my experience, when you’re not actively thinking about rooting the palm of your hand into the ground in handstands, the hands have a tendency to twist out onto the sides.
I see it all the time in beginner students: they are so focused on everything else, that they forget to engage their palms and fingers.
This results in the weight distribution in their palms being almost entirely on the wrists and the outsides of their palms.
Which mightn’t be so terrible if you’re in a table top position. But when you’re handstanding and your entire body weight is on your hands, you want to be able to engage your hands to protect your wrists from strain!
Practicing hand engagement will help you avoid making that mistake, which will really put a lot less strain on your wrists in the long run AND help you gain much more control and improved ability to balance in handstands!
Correct hand engagement for handstand – step-by-step
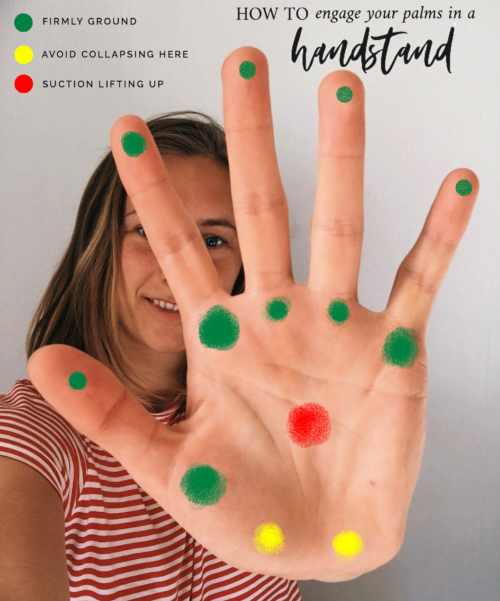
Place your hands on the ground yet again!
See if you can really push down through your index finger knuckle and keep that engagement from the moment you place your hands on the ground till the moment you exit the handstand!
This will both help you start balancing from the moment your feet leave the floor to the moment they land again (and protect your wrists).
Let’s not forget about fingers in handstand either! They are hugely important as they’re your breaks – keeping you from falling over onto your back side!
You want to really grip the floor with your hands. Imagine you’re catching a tennis ball or another small round object, fingers wrapping around it – now do that to the ground.
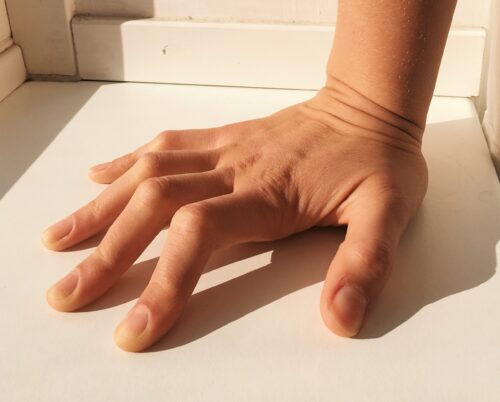
This will make you bend at the second knuckle of your fingers and keep the first joint of your fingers grounded. That way you can really use your fingers to push into the ground, and engagement which seems impossible if the fingers are straightened out completely.
Note: if your fingers turn a little white – that’s probably means you’re doing it right! :p
The fingers are an essential part of balancing in handstand because they help us adjust and recenter if the balance is coming too far forward to our back side.
So grip the floor!
Now, do your hands look like two spiders? Yep, there’s a reason people call the fingers in handstands spider fingers 😛
Stacking of joints
To get that perfectly straight line handstand, we need to be able to stack our joints on top of each other – bone stacking.
Fun fact: Some people even call the straight handstand a one bone handstand because you want to find such a strong and stable line, that you can imagine the entire body being just one bone.
Before we jump in, I want to say that there are many styles of handstand. You might find that what I’m sharing isn’t how you want to handstand. Feel free to take the tips I share that make sense to you and leave the rest behind.
That said, I do recommend working towards a straight line handstand! The reason being that a straight handstand is the most efficient (requiring the least effort once you’ve got it), since the entire body is stacked in one line.
Plus: if you’re doing a banana shaped or some kind of not straight handstand, it might be because you’re compensating in one joint of your body for a lack of mobility or strength in another joint.
A classic example is when people are lacking the range of motion (mobility) in the shoulder to lift the hands straight overhead (shoulder flexion) and therefore have to arch their lower back to do a handstand. Whilst this likely isn’t dangerous in the short term, it might lead to repetitive strain of the lower back in the long term, which can result in injury.
Now, let’s get back to looking at the stacking of joints!
If you want to do a straight handstand you want to eventually be able to stack all of your joints in one line.
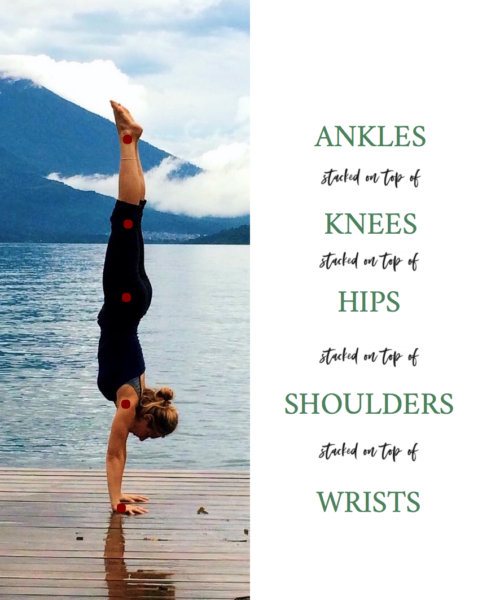
First wrists, then elbows, shoulders, spine, hips, knees, and ankles – all in one straight line.
Like I shared in the previous post of this series, the straight line handstand might not be possible for you yet. A straight line handstand requires a lot of wrist and shoulder mobility and strength. Feel free to go back to the previous post and work on the foundational exercises I shared, if you think you need to catch up on those before reading on.
Still with me?
Great!
Let’s talk about finding that stacking of the joints. I’m going to share an exercise with you, which is performed lying on the floor. So don’t worry, you won’t have to think about balancing yet!
Hollow body shape
The hollow body position is my absolute favourite exercise to practice handstand line and finding core connection!
It helps you build strength and muscle memory to find a strong and stable line. So once you’re finally trying to balance on your hands, you’ll already be a few steps ahead because you’ve built the awareness and muscle memory of the hollow body shape first!
Prone hollow body shape
To enter this position, start lying down on your stomach.
- Stretch your arms out in front of you.
- Extend your hips.
- Tuck your pelvis (posterior pelvic tilt), so you’re lengthening your lumbar spine and contracting your lower abdominal muscles. Your belly should be lifting up from the ground.
- Suck your inner thighs together.
- Lock out your knees by engaging your thighs. Keep the pelvis tucked still, this should start to fire up your glutes too.
- Point your feet to keep them engaged.
- Knit the ribs in and together so you’re rounding your upper back slightly.
- Lock out your elbows.
- Lift your shoulders towards your ears (elevated scapula).
- Try to lift hands up off ground
- Bend your wrists (wrist extension)
And there you have it! The prone hollow body shape, which will look exactly like the shape you want to find when you’re handstanding.
If you’re keeping everything engaged correctly this position should be super tough to hold for a long amount of time!
Try doing 3 sets of 5-10 second holds to build strength and muscle memory! If that feels fairly easy go for longer holds.
Supine hollow body shape
The supine hollow body position is very similar to the prone one. The biggest difference is that you’re lying on your back instead of your stomach in this one.
BUT the supine hollow body position is extra great to practice core engagement for the handstand!
This time gravity is working against you, as you want to lift arms and legs off the ground so it’s going to demand more core activation.
So when you’re ready to try it out, lay down on your back.
- Lift your legs up towards the sky.
- Press your lower back into the ground by finding the posterior pelvic tilt again and sucking in your lower belly.
- Then lower your legs down as far as possible whilst keeping your core engaged and lower back grounded.
- Point your toes, fully extend your knees and keep your inner thighs together.
- Stretch your arms out overhead. Tuck your arms in close to your ears and lift your shoulder blades up towards your ears.
- Lift your shoulder blades up off the ground by knitting your ribs in, finding engagement in your abdominal muscles.
- Bend your wrists if you want to imitate the handstand shape fully.
There you have it!
Once again, you can do 3 sets of 5-20 second holds to build strength and muscle memory for the handstand.
Alignment & form in handstand
In my opinion, when it comes to handstand there’s no such thing as one true “proper” form in a handstand. There are definitely alignments and forms that are more efficient than others though.
These alignment and engagement cues have helped me tonnes to find stability and ease in my handstands and work towards building that straight line.
Hopefully they’ll help you too!
HANDS + WRISTS:
- Place hands shoulder distance apart.
- Let your index fingers be parallel, pointing straight forward.
- Root down your index finger knuckles to engage the palm.
- Grip the floor with your fingers.
ELBOWS:
- Keep the elbows straight.
- If you have hypermobile elbows (like me) you want to imagine magnetizing your hands towards one another when you handstand (without your hands actually moving, it’s just to find the proper activation in your arms). This will create muscle engagement on the inside of your arms to support and protect your elbow joints in handstands.
SHOULDERS:
- Push the ground away to lift up and out of the shoulder. You want to imagine doing the opposite of sinking into your shoulder.
- Find external rotation of your shoulders by rotating the front of your upper arm out to the side. This will fire up a lot of muscles which help stabilise the shoulder joint and will help prevent you sinking passively into your shoulder joints.
SPINE:
- Knit the ribs in to keep the hollow body shape. This will help you connect to your core so you can engage it!
- Tuck the tailbone under / lengthen it down towards the ground to avoid arching your lower back. This will fire up your abdominals, which help keep you stable in handstands!
HIPS + LEGS:
- Extend your hip but keep tucking the tailbone.
- Magnetize your inner thighs together.
KNEES:
- Keep knees locked and straight. This will keep your thighs active.
ANKLES + FEET:
- Extend your ankles.
- Point your toes.
I’m amazed if you made it this far! Great work!
This post of the series was all about learning to find the handstand shape and correct alignment.
In the next post we’ll be working on building up our courage for a free handstand. I’m going to be sharing my favourite wall exercises to help you get comfortable with being upside down!
So stay tuned for the next post in the series: The Complete Handstand Guide, which is all about building up courage and awareness doing handstands by the wall before we finally start practicing free-standing handstands.
Best of luck on your handstand journey!
I’m rooting for you,
xox
Cami

Wow thank you so much for these posts! I’m collecting information from a lot of different places and trying to learn this amazing skill.
I’ve realised my wrist and fingers are the problem! So I’ve signed up for your ebook and I plan on practicing ever day!
Thanks so much for your generosity
Suze x
Thank you so much for the kind words, Suze! I’m really glad you’re finding it helpful – I hope my wrist ebook will help you out too!
Cammie x
Hello Camilla Mia,
Thank you for your wonderfully thorough and descriptive feature on the handstand. Very useful. But I am confused about the 2nd sentence in the following statement, “tuck the tailbone under and lengthen down towards the ground…” Please clarify.
SPINE:
Knit the ribs in to keep the hollow body shape. This will help you connect to your core so you can engage it!
Tuck the tailbone under / lengthen it down towards the ground to avoid arching your lower back.
The tailbone sits under the sacrum and points backwards, so tucking it under basically means tilt your hips so your pubic bone moves forward and your butt tucks in.
Knit the ribs in means lower your ribcage, so the space between your pubic bone and collarbone shortens.
Hope this helps! 😀