In this post I share all the handstand wall exercises that helped me learn the free-standing handstand. This post is part of my series: The Complete Handstand Guide for Beginners. If you missed the introduction or the first two posts of the series, click the link below to go back and read them first.
Now you’ve got the strength & mobility foundations and the alignment of a straight handstand covered. It’s time to apply what we know!
..but first
Create a safe practice environment
You’ve got the strength and mobility foundations down and it’s time to finally practice getting upside down. But! Before going upside down for the first time you will need to create a safe practice environment. Start by finding a space near a wall and make sure there’s enough space for you to move. We’ll need the wall for the handstand exercises in this post!
It can be nice to take a moment to move objects such as furniture out of the way. That way you don’t risk hitting them when you enter or exit a handstand. You can put a crash pad or a soft mat out on the floor, if it helps you.
Are you ready to go upside down? Awesome!
Be patient with yourself
The following handstand wall exercises will help you start to get a feel for being inverted. It can often be quite confusing the first couple of times you’re going upside down. At first you will likely have limited body & spacial awareness in this new position. The more you practice the following handstand wall exercises, the more awareness and muscle memory you will build.
Note that it’s absolutely essential to warm-up before doing any of these handstand wall exercises! The foundational exercises I shared here, are great to use as a warm-up. I highly recommend spending 10-30 minutes on warm-up before you move on to the handstand wall exercises in this post.

Practicing these handstand wall exercises regularly will make you more comfortable with inversions. It will move you forward on your journey to your first free standing handstand!
Let’s do this!
Handstand wall exercises to learn the free handstand
The wall is a brilliant tool for learning to handstand. It forms a vertical line, which can serve as support when you’re not quite ready to balance a handstand completely on your own yet. Practicing handstands by the wall also helps you find the best alignment in a handstand. The wall guides you into alignment so you eventually become perfectly parallel to the wall’s vertical line.
The following handstand wall exercises can feel scary to do at first. If you feel safer using a spotter, ask a friend to help you out. I’ll talk more about how to use a spotter for handstands at the end of this post. Scroll down and give it a read now, if you have a spotter.
If you’re feeling a bit scared and vulnerable going upside down in the beginning, know that that is perfectly normal. I promise that this exercise will seem less scary the more you practice it!
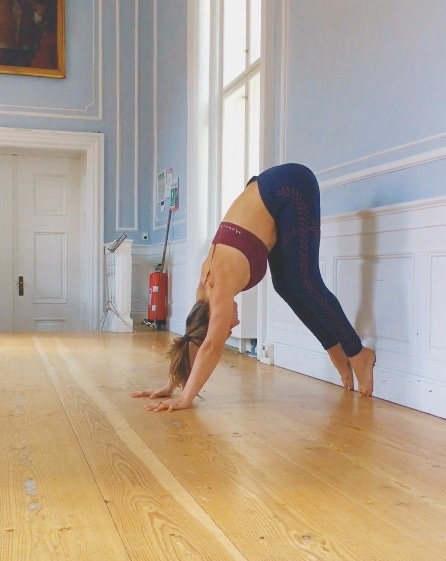
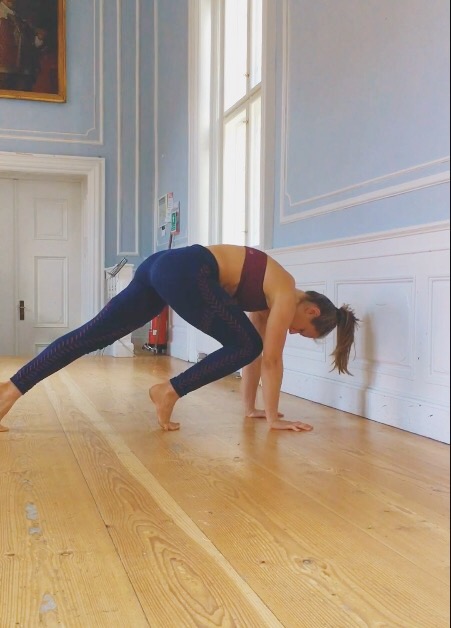
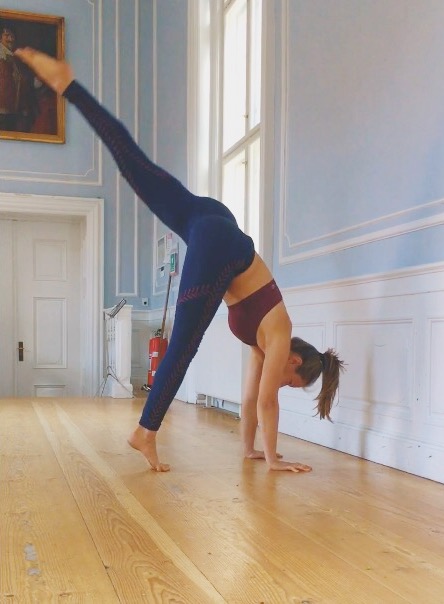
Downward facing dog / L-shape by the wall
This first handstand wall exercise is called downward facing dog on the wall or L-shaped handstand. It will help you get used to stack your hips on top of your shoulders and hands.
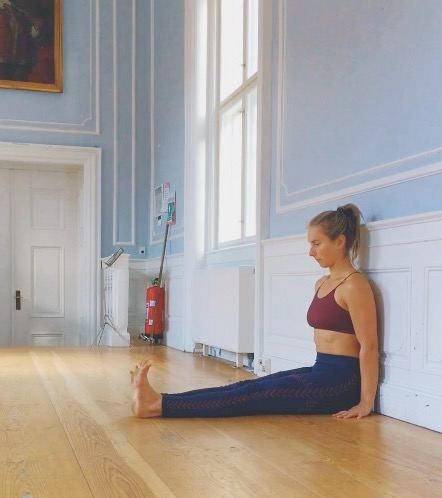
Start by measuring out how far from the wall you will need to place your hands. You can do this by sitting with your back straight against the wall and your legs stretched out in front of you.
You’ll want to place your palms roughly where your heels are placed on the floor in the above position. Place your palms so they’re shoulder width distance apart with your pointer or middle fingers pointing forward. Then find a table top position with the soles of your feet on the wall.
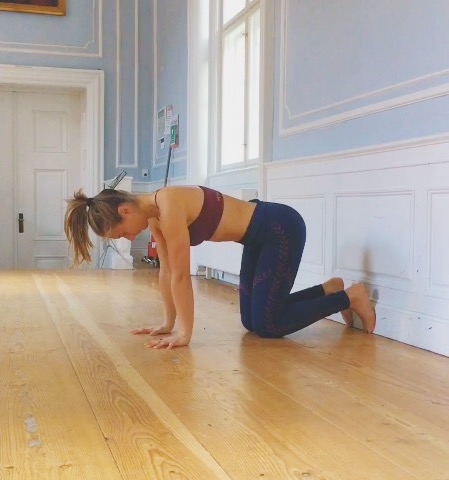
From here, start to lift your knees off the floor and push your hips back. Keep the knees bent. You want to keep the palms firmly grounded into the floor. Push the ground away so your shoulders move up close to your ears.
Push
Keep pushing into your hands. Then step one foot up on the wall right behind your hips keeping the knee bent.
Keep pushing and step the other foot up on the wall beside the first one.

When you’re ready you can start to straighten your legs, which will move your hips forward and above your hands.
If you can’t fully straighten your legs because your hamstring aren’t flexible enough yet, you can keep the knees bent. Or you can try the exercise again placing your palms a little closer to the wall in the beginning. That way you are able to stack your hips above your hands whilst keeping the knees bent.
A few more notes on the exercise
This first handstand wall exercise is a great way to start to get comfortable with being upside down. If you’re new to this exercise, it can often feel like your hips are stacked right above your hands even when they’re actually a lot closer to the wall, than you might think.
TIP: If you want to check your own alignment, you can ask a friend to give you feedback on your alignment. You can film yourself doing the exercise (I highly recommend this one!). Filming yourself can be super helpful, especially in the beginning. It teaches you that what you FEEL you’re doing in an exercise can actually be quite far from what you’re ACTUALLY doing (I know because I’ve been there 😉 ). It can help give you a better awareness of what is actually going on.
It can take some tries over the course of days, weeks or even months to feel comfortable with this exercise. Once you start getting comfortable having your hips stacked right above your shoulders and hands in the L-shape, you can try out the next progression of this exercise.
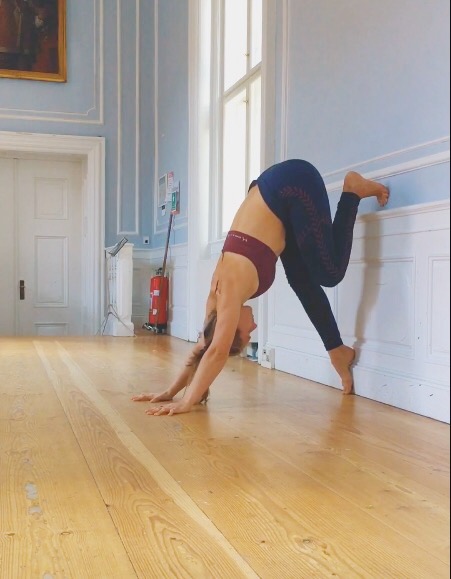
PROGRESSION: Downward facing dog by the wall with one leg lifted
Start by moving into the L-shaped handstand position by the wall as described earlier. From there you want to move one leg off the wall. Stack it above your hips in a slow and controlled manner. As you lift your leg you will start to notice the weight shifting forward and more weight coming into your hands. Keep pushing firmly into your hands, especially your fingertips.
This position is great to start controlling the balance in your handstand by micro-adjusting with the hands. When the weight is moving towards your backside, you want to really dig your fingertips into the ground to stop the movement from going too far over. When the weight is moving in the opposite direction, you want to press the heel of your hand into the ground to stop yourself from falling to your front side. Always try to return to center after a micro-adjustment with your weight evenly distributed in the center of your palms.
Tired of dealing with aching wrists in your handstand practice?
Get The Complete Wrist Guide so you can practice yoga, arm balances, and handstands with ease and stability!
The ebook includes 17 exercises that build strength and flexibility in your wrists and forearms, two exercise program templates, and a printable wrist exercise sheet, along with tips on how to position your hands and distribute weight in your palms for optimal comfort and balance.
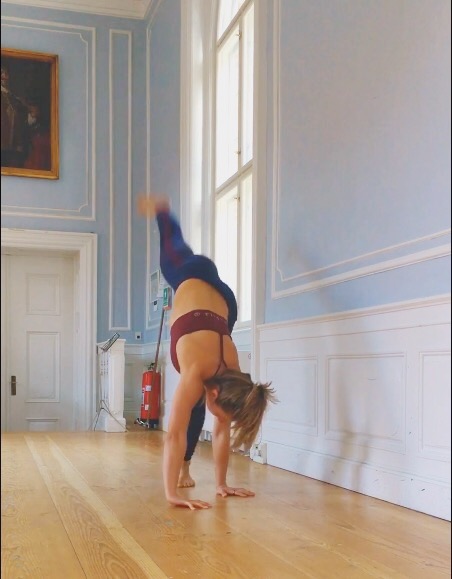
Kicking into a handstand by the wall
Start by placing your hands on the ground about a shins distance away from the wall. Your fingertips should be pointing towards the wall. You can measure by placing your foot against wall and put the heel of your hands down where your knee was. From here, you want to come into a plank position. Stack the shoulders directly on top of your hands and keep your elbows straight.
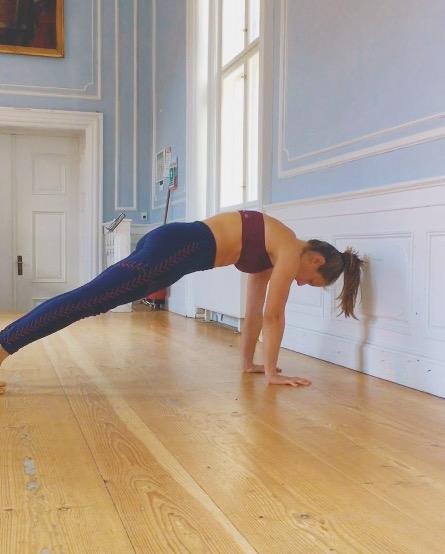
Then lift one leg and step it forward so it’s about halfway (or a little closer) to your hands. Draw your ribs and navel in so the back is slightly rounded and your core is engaged.
Bend the front leg deeply like a coiled spring. When you’re ready to set off, straighten the leg as you jump with the front foot off the floor. At the same time, use your back leg to gain momentum by keeping it straight and swinging it up and over your shoulders as you jump off the floor with the front foot. You want to keep your core engaged (hollow body position) throughout the entire movement.


A few more notes on the exercise
Utilizing the breath
TIP: You can use your breath to get more control and momentum into your scissor kicks. Take a deep exhale and empty as much air out of your lungs as possible. At the end of the exhale you’ll notice you can’t help but engage your abdominals muscles. For that reason, I like to take an inhale, and then kick up while I exhale to engage my core on the way up. This helps me find my handstand line better and therefore making it easier to find balance when I kick up.
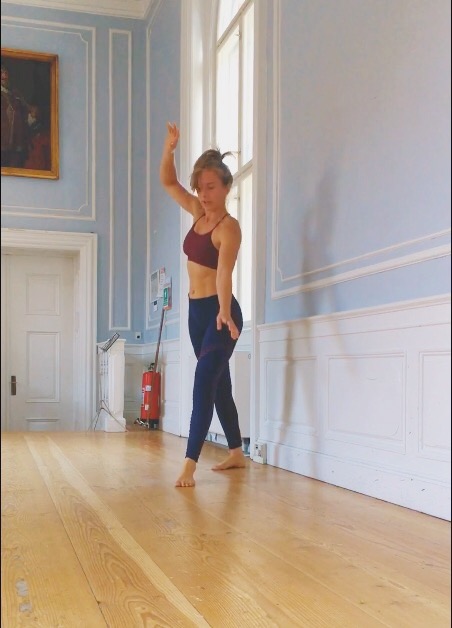
The movement of kicking up into a handstand can seem impossible when you’re new to it. That’s because many different body parts need to move in different ways at the same time and with a certain tempo in order for the movement to feel effortless. The type of coordination needed for the movement only comes from regular practice. Be patient with yourself and keep practicing. Eventually you will build the proprioception and muscle memory it takes to do the movement. It will feel like a piece of cake to kick hard enough to end up in a handstand.
Use props!
TIP: If it still feels impossible to kick up after many tries, here’s a trick that might help you out. Grab two blocks (or sturdy books, etc.) and place one under each of your hands. It will take a lot more force to get you up into a handstand with blocks under your hands. Practicing like that will get you used to really fling your body up there. When you’re warm after a few tries, place the blocks under your feet this time. This will elevate your feet and make the kick up require a lot less force. The kick up should feel a lot more accessible now that blocks have moved from under your hands to under your feet.

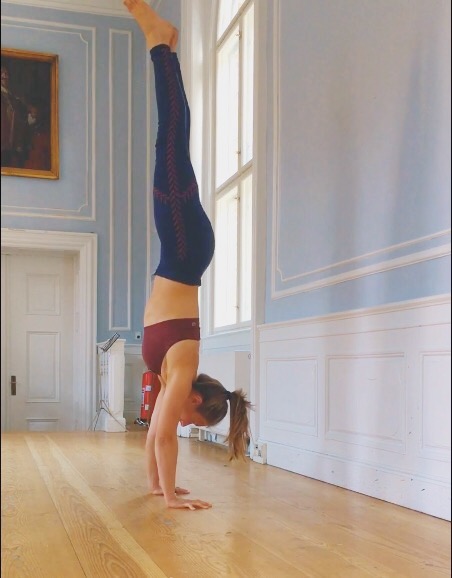
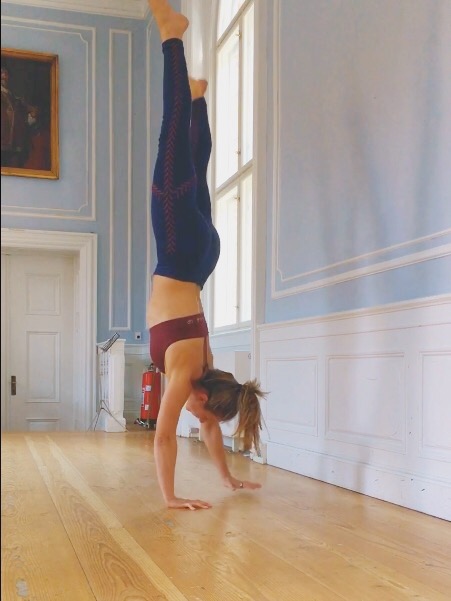
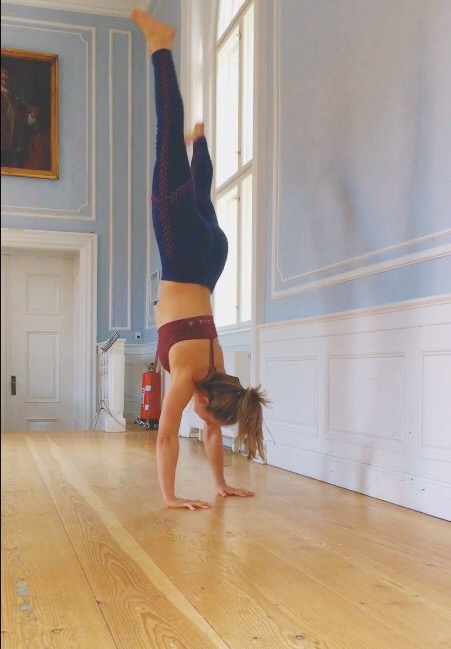
Back-to-wall handstand
Start by placing your hands a shin’s distance from the wall with your fingers pointing towards the wall. Kick up into a handstand (enter as described earlier) with your back against the wall. Bend your knees and come on to your tip-toes on the wall.
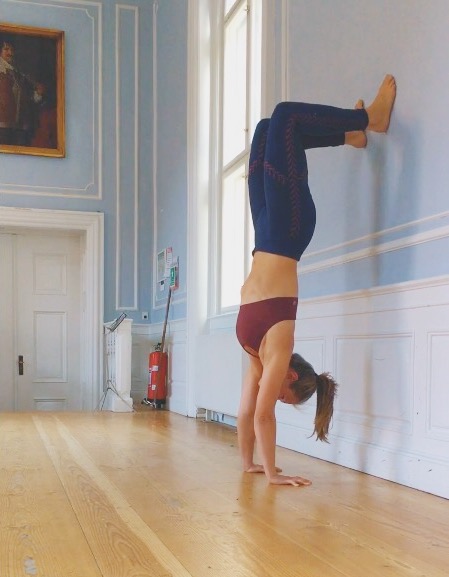
Push firmly into the palms of your hands, and keep your gaze in between your wrists. Keep drawing your ribs and navel in. From here, squeeze your thighs and your bum and straighten one leg up towards the sky. Try to find some balance here, with only one foot on the wall. Eventually try to straighten both legs up into the air and maintain balance.


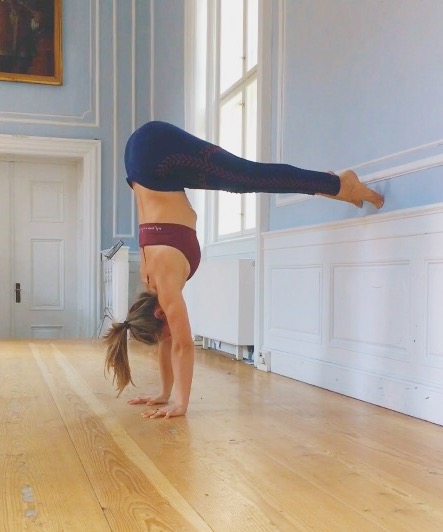
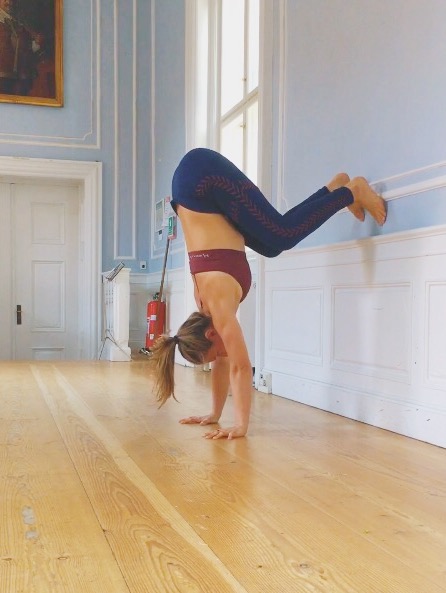
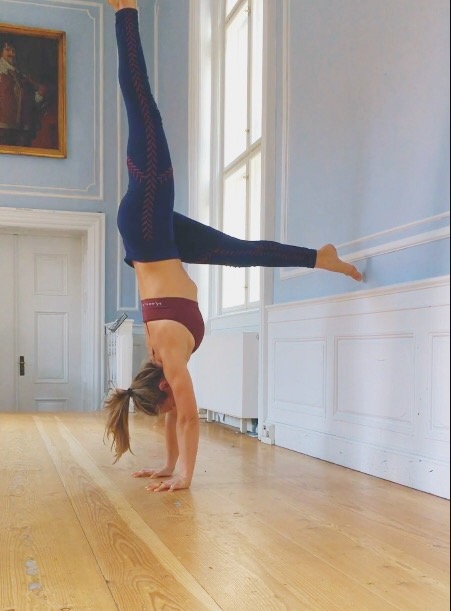
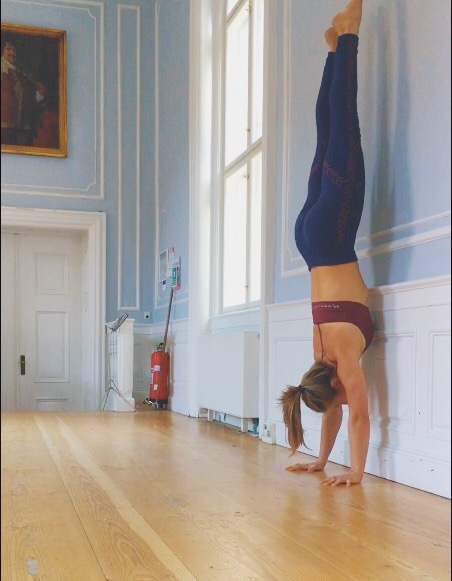
Front-to-wall handstand
Start in an L-shaped handstand by the wall (enter as described earlier). From here walk your feet up the wall, until they’re almost straight. Then walks your hands back towards the wall until you can straighten your legs fully and bring the tops of your feet to the wall. The further back you can go, the straighter your handstand is going to be.


From here, bring your feet together and squeeze your bum and thighs. Pull your ribs in and off the wall and most importantly keep pushing into your palms to lift your shoulder blades towards your ears. This pose will really help you build strength and handstand endurance. Stay for as long as feels comfortable and start to build up towards holding it for 20-60 seconds.
Using a spotter
If you feel unsafe practicing handstands by the wall on your own, get someone to spot you. There are different types of spotting techniques depending on how you might fall out of a handstand.
Spotting techniques
The most common spotting techniques for handstands are:
- Spotting under the shoulder – this technique is useful for handstand beginners who have a tendency to collapse in the arms or planche too far forward with the shoulders. If this applies to you ask your spotter to squat down in a stable stance closely by your side and place their hands in the space just below your shoulder (without touching you unless necessary). That way they can support your shoulders if you’re collapsing down toward the ground or block your shoulders if they start to move too far forward past the wrists.
- Spotting by the hips – this technique is useful for handstand beginners who are stable in the shoulder region but have a tendency to overshoot and fall towards their back side. If this applies to you, ask your spotter to stand close to your side or behind you in a wide stable stance and place one hand on each side of your hips (without touching you unless necessary). That way they can pull your hips back in line if you’re falling too far towards your back side.
- Hybrid spotting – the spotter stands close by at the side of the handstand practitioner. They have one arm going across the lower back with the hand close to the side of the hip, while the other hand is close to the shoulder. Again, the spotter needs to make sure they’re standing in a squat like position, so that they’re stable and ready to catch some weight and receive impact without falling over themselves.
Maybe you don’t yet know what you tend to do when you’re upside down. That’s completely normal! I suggest to use the hybrid spotting technique and ask your spotter to stay super alert.
Assisted entry to handstand
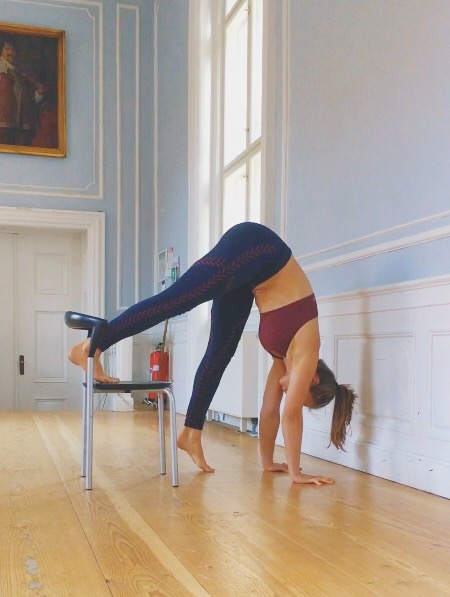
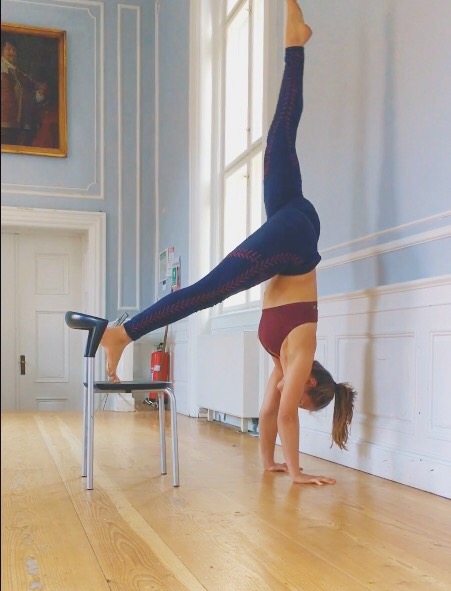
If you want a break from all of the kicking into handstand, get a chair or ask a spotter to help you into handstand. The following handstand entry assist is called a scissor lift.
Scissor lift with a chair
Place a chair a legs distance from the wall with the seat of the chair facing the wall. Then place your hands on the floor a shins distance away from the wall right in front of the chair. Step one foot up on the chair, the other foot starts on the floor in front of (or to the side of the chair). Stack your shoulders over your palms, push into your hands. Then push into the foot you have on the chair to bring your other leg up and over until it touches the wall behind you. From here the weight should be far enough to your back side, that you can lift the other leg up to meet the first on the wall.

Scissor lift with a spotter
Set up for a handstand by the wall as you normally would, with your hands a shins distance away from the wall. Stack your shoulders above your hands and bend and lift one leg up to horizontal. From here, ask your spotter to place their forearms beneath your shin to support it. Push your shin down into their forearms to lift your other leg off the ground and up. Once your other leg is touching the wall, you can lift the first leg up off the spotter to meet the other one on the wall.
Exiting a handstand safely
I’m going to be talking a lot more about exiting your handstand in the next blog post, but for now I want to talk about the safest and easiest ways to exit a handstand.
If you fall towards your belly side, you will simply land on your feet again. One thing to note though, is that it can be hard on the joints to land with straight legs. Try to get used to bending your knees when you fall out just as your feet touch the ground to take some of the force out of your landing. This should help the fall feel lighter and less hard on your body.
If you fall towards your back side, you want to turn out to one side in a cartwheel like motion. This is called the bail out method, which is a much less straining way of falling to the backside than trying to land in wheel pose.
STEP-BY-STEP: Bailing out of a handstand
As soon as you feel your center of gravity travel past your palms, you want to take a step forward with one hand, twist your hips out to the same side as the hand and bend at the hip to bring the foot on that side down to land on the ground first, followed by the second foot. If you’re unfamiliar with doing cartwheels, it might be a good idea to get a spotter to help you practice them. The spotter can spot you by the shoulders and hips.
Addressing and overcoming fear & self-limiting beliefs
Writing exercise: write down the fears which are holding you back when it comes to handstands.
- Which self-limiting beliefs are you telling yourself?
- How can you reduce the chance of something bad happening?
- What is one step you can take this week to reduce your fear of handstands?
Congrats if you made it this far and tried out some of the handstand wall exercises! You are taking the steps to get closer to your first free handstand.
Feel free to comment below if you have any questions or comments for me! I hope you feel empowered and excited in your handstand journey!

This series is the best I have ever come across. Thank you so much for taking the time to document and share this. It is so very helpful. I shall follow this going forward.
Thanks so much! I’m really glad you found it useful. The next part of the series is out now if you want to have a read.
The handstand techniques are so great. Thanks for your ebook.
I am continued on to master my handstand.
This is an excellent tutorial. I am stuck on the kick up to the wall, and I like your comments on spotting and suggestions. Thanks so much.