Sun salutations were NOT what made me fall in love with the yoga practice. The first few yoga classes I ever went to were quite traditional in the sense that we warmed up doing 5 rounds of Surya Namaskar A followed by 5 rounds of Surya Namaskar B, then moving on to some other traditionally structured sequence. Back then I thought that was all yoga could be; repetitive and uncreative. Luckily I was wrong.
The repetitiveness and lack of creativity in sequencing a yoga practice by repeating sun salutations did not appeal to me then but I have since learned to surrender to that style of yoga practice every once in a while. I appreciate it for the meditative state it’s possible to get into when you know exactly where you’re going because you’ve done the sequence hundreds of times before.

If you’re like I was back then and are craving a more free, playful, and creatively sequenced yoga practice there are still a couple of reasons why it’s valuable to learn the traditional sun salutions:
Why It’s Great To Learn The Sun Salutations
The sun salutations are the common language in the physical yoga practice. You can go to a yoga class almost anywhere in the world and there’s a good chance you’re going to be practicing some style of sun salutation if you’re doing a vinyasa/flow style practice where breath and movement is linked.
There can also be something very grounding and therapeutic about a set sequence of poses because you always know where you’re going, so you’ll have more mental space to focus on your breath and stay present in your body. But apart from that, the sun salutations provide a brilliant foundational sequence for beginners who want to learn to flow on their own.
If you’re starting your own yoga practice at home, you can use the sun salutations as a foundation from which you create more creative sequences. Just add in a few extra poses or do a different variation of the traditional poses and you’ll be practicing a sequence that will feel more unique and creative than a regular sun salutation (and you created it yourself!).
This is the aspect of the yoga practice I LOVE where I get to express myself creatively and play around with new poses and transitions when I flow in my yoga self-practice.
Want a fulfilling yoga self-practice at home but unsure where to even start?

Get the mini-course 7 Days to Start a Yoga Self-Practice to establish a lasting and inspiring independent yoga practice at home!
In 7 days and 7 challenges, the mini-course takes you through how to establish a yoga self-practice step-by-step.
How to practice sun salutations
There are a plethora of different variations of sun salutations out there (some more suited for beginners than others). I would say that there are three sun salutations that are more commonly known and taught than the rest. Those are Surya Namaskar A, Surya Namaskar B, and what I call the classical sun salutation.
Let’s break down the individual poses of the sun salutations first and then I’ll show how you can link them together with the breath so you can start flowing through them on your own in your yoga practice.
The yoga poses of the sun salutions
The full expression of some of the sun salutations are quite demanding when it comes to strength and flexibility, especially if you’re just getting started with yoga. Remind yourself that your sun salutations don’t have to look a certain way to be “right”. You can always modify the poses to make them more or less challenging.
Mountain Pose (Tadasana)
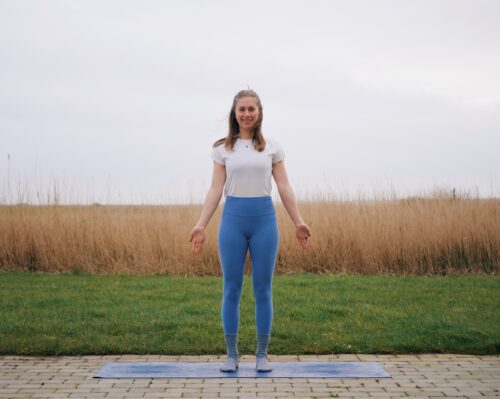
Mountain pose is one of those yoga poses where it looks like you’re doing nothing. But if you’re engaging in all the right places then Mountain pose can be quite the challenge!
How to do mountain pose:
Stand with your feet touching or hip-width apart, ground into the earth with all four corners of your feet. Engage your thighs, tuck the tailbone if you’re arching your lower back so your pelvis is in a neutral position, and engage the glutes (muscles of the bum). Lengthen through your entire spine, allow the shoulder blades to relax together and down the back, and tuck the chin in slightly so the back of your neck elongates. Externally rotate your shoulders so your palms are facing forward and there you have it: mountain pose. Not as easy as it looks, now is it? 🙂
There are three common variations of mountain pose – the one where the arms are along the sides of the body, palms facing forwards. A variation with the palms connected in front of the heart in anjali mudra. And a third variation with the arms lifted up overhead. You’ll move through all three variations in most sun salutations.

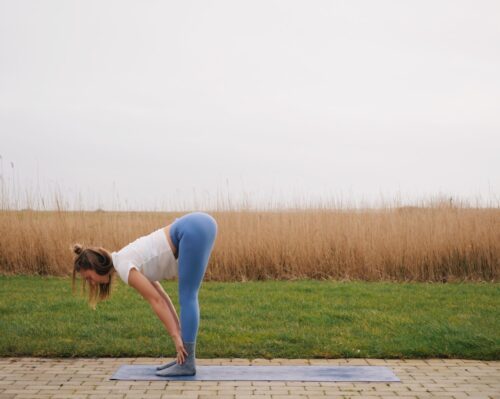
Standing Forward Fold (Uttanasana)

Forward folds are so great for all us modern life people who spend a long time sitting down every day. They help improve flexibility in the hamstrings, which can ease low back pain and other symptoms of sustained periods of desk work.
How to do standing forward fold:
Stand with your feet hip width distance apart. Bend your knees slightly and fold your torso over your legs hinging from the hip (and not the lower back!). Place your hands next to your feet. I highly recommend keeping the knees bent if you’re relatively new to yoga and are finding yourself having to round your back a lot to fold. By bending the knees slightly so the spine can lengthen more the stretch should move into the back of the thigh (hamstrings), which is where we want it!
Half Standing Forward Fold (Ardha Uttanasana)
Half standing forward fold is great because it teaches us how far we can fold without rounding our back. I find this great to start building the awareness of how often we’re compensating for our lack of hamstring mobility by rounding our backs and will give us an honest assessment of whether we might want to build more flexibility in our bodies.
How to do half standing forward fold:
Fold from the hip with a long, straight spine. Let the arms stay straight and hands either placed somewhere on the front of the leg or for really flexible people on the floor. Don’t worry if the floor feels thousands of miles away in the beginning, it will get closer eventually, I promise. Also, if you’re locking your knee joints and finding discomfort in the knees then try to bend the knees a little bit and notice if the stretch feels nicer then.
Chair Pose (Utkatasana)
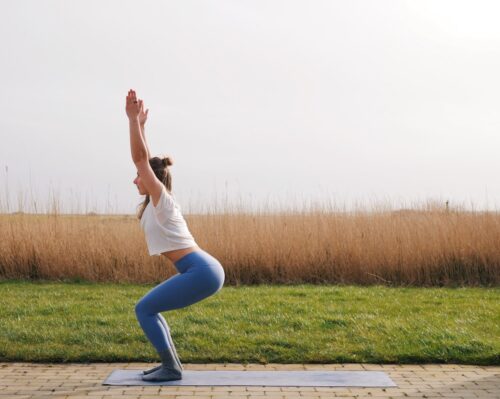
Chair pose is amazing because it’s one of the few poses in traditional yoga that target our glutes (muscles of the bum). That’s probably also why it’s a hard one to hold for several breaths.
How to do chair pose:
Stand with your feet hip width distance apart. Bend your knees, send the hips back, and ground down through all four corners of your feet. Bring your thighs as close to parallel with the floor as your body feels comfortable allowing, and keep your knees hip distance apart. Lift your arms overhead with the palms facing each other. Keep your chest lifted and your spine long.
Crescent Low Lunge (Anjaneyasana)

If you spend a lot of time sitting in your daily life then any style of lunge is super valuable to practice. In lunge poses the hip flexor muscles (front of the hip) on the back leg is lengthened and stretched. This can relieve low back pain and other compensational issues stemming from too tight hip flexors (an issue I’ve personally delt with).
How to do crescent low lunge:
From a forward fold step one leg backwards and lower the back knee and the top of the back foot into the mat (add padding underneath the knee if it feels too sensitive to be directly on the mat). Let the knee in the front stay over your ankle. Engage your inner thighs together. Find a neutral pelvic position (avoid arching your lower back) by drawing your tailbone down toward the floor and lifting your pubic bone toward your navel. You should be able to feel a stretching sensation at the front of the hip and the thigh on the back leg.
Lift your torso up and extend your arms overhead. Lift your chest up by squeezing your shoulder blades together and down. step one leg backwards and lower the back knee and the top of the back foot into the mat (add padding underneath the knee if it feels too sensitive to be directly on the mat). Let the knee in the front stay over your ankle. Engage your inner thighs together. Find a neutral pelvic position (avoid arching your lower back) by drawing your tailbone down toward the floor and lifting your pubic bone toward your navel. You should be able to feel a stretching sensation at the front of the hip and the thigh on the back leg. Lift your torso up and extend your arms overhead. Lift your chest up by squeezing your shoulder blades together and down.
Warrior I (Virabhadrasana I)

This pose is not beginner friendly. The alignment of the pose is to have the hips facing forwards and the back heel grounded, which requires a lot of hip flexibility. If the hip flexibility isn’t sufficient to be able to do that then the back knee will compensate by twisting and we definitely want to avoid that at all costs! If you feel like you knee is in a compromised position in this pose try to make your stance wider and have the feet closer together. If it still feels painful or uncomfortable in the back knee I suggest lifting the back heel off the ground. Do not ever stay in a pose that feels painful, promise?
How to do warrior I:
From a downward facing dog step one foot forward in between your hand and spin the heel on your back foot into the mat. Take your back foot a bit more out to the side if your knee feel compromised in a narrower stance. Squeeze your inner thighs together and find a neutral pelvic position by drawing your tailbone down toward the floor and lifting your pubic bone toward your navel. Lift your torso up and extend your arms overhead. If possible bring your palms to touch. Lift your chest up by squeezing your shoulder blades together and down and gaze up at your hands.
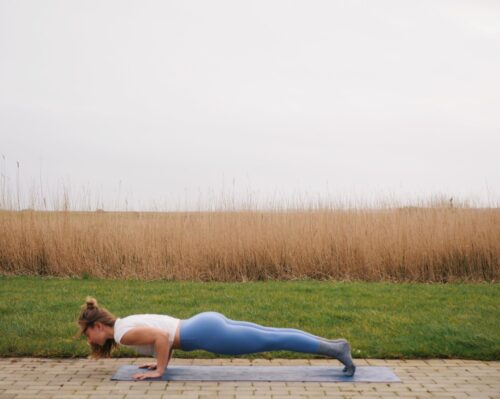
Plank Pose (Phalakasana)
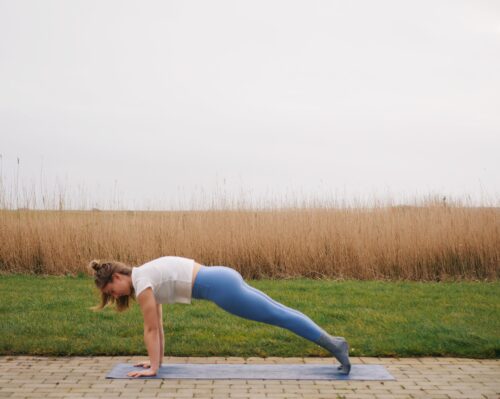
In sun salutations plank pose is not held for any breath count, it is just a pose that we pass through between other postures. Plank pose is great for building shoulder, wrist, and core strength. It’ll help you build a solid foundation of strength in your yoga practice needed to do arm balances and handstands and other inversions.
How to do plank:
From a forward fold place your palms on the ground shoulder width distance apart, spread your fingers and root them into the ground, and step your feet back. Move your shoulders forward until they’re stacked on top of your wrists. Press the ground away and spread your shoulder blades away from your spine. Spread your collarbones away from the sternum to keep the chest long. Keep your hips high and a neutral pelvis (avoid over-arching your lower back). Keep the back of your neck long and gaze down between your hands.
Knees-chest-chin (Ashtanga Namaskara)
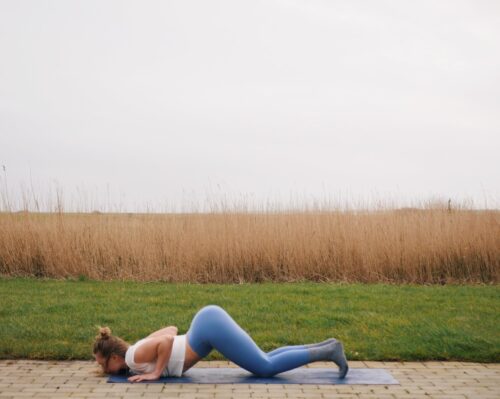
Although knees-chest-chin is an easier alternative to chaturanga dandasana, it’s not the best precurser to eventually practicing chaturanga because it reinforces the most common misalignments in chaturanga. Knees-chest-chin is still taught in many places however, so it’s still nice to know how to practice it.
How to do knees-chest-chin:
From plank pose lower your knees to the ground. Hug your elbows to your sides and point them back. Keep your hips lifted as you bring your chest to the ground. Keep pushing firmly into your palms and gently touch your chin to the floor.
Four-Limbed Staff Pose (Chaturanga Dandasana)
Four-Limbed Staff Pose more commonly know as ‘chaturanga’ is one of the best poses in yoga to build upper body strength. It is however also one of the hardest for many people since it requires a lot of engagement in the nearly the entire body. I some yoga classes chaturanga is performed 50-100+ times and if performed ‘badly’ or inefficiently it can put too much load on the shoulder girdle. Therefore the alignment of chaturanga is quite important, especially when you’re a beginner because it’ll make sure you’re putting the least amount of strain on your body when you’re doing the pose. I highly recommend practicing chaturanga with your knees lowered onto the ground when you’re first starting out to build strength and body awareness before moving on to the full variation.
How to do chaturanga:
From a plank pose lean the shoulders forward so they’re stacked on top of your palms and come up on the balls of your feet. Keep your collarbones spread away from the sternum (to keep from rounding your torso) and keep your entire body engaged from the crown of your head to your heels in one long line as you start bending your elbows, keeping them over your wrists. Squeezing your elbows to your sides lower down until your elbows are at your sides. Make sure your shoulders are not dipping down below your elbows since this puts a lot of load on the shoulder girdle (and can lead to injury if done repetitively if your shoulder joint is not strong enough to withstand the load repetitively).

Cobra Pose (Bhujangasana)

I’ve had lower back issues many years of my life. I don’t anymore and this pose is one of the reasons I no longer do. In cobra pose you’re lying on the belly meaning you have to actively engage your back to lift into the backbend (especially in low cobra). This is teaching a valuable body engagement and awareness necessary in all types of backbends to perform them with strength and integrity (and avoid straining the lower back). Cobra pose builds mobility (active flexibility) in the upper spine, which is less naturally flexible compared to the lower back. Cobra pose teaches your body to use the whole spine for backbends instead of relying on the natural flexibility of the lower back. I’m a fan!
How to do cobra pose:
Lie on the ground with your belly down. Stretch your legs back, tops of the feet on the floor. Spread your hands on the floor under your shoulders. Hug your elbows back to the sides of your body. Press the tops of your feet, your thighs, and the pubis firmly into the ground. Start lifting your torso up off the ground (I like to teach this with the palms floating off the floor first, so you’re lifting from your back muscles). Then you can start pushing into the palms and squeeze your elbows to the sides to lift higher (but keep the engagement in your back!).
Upward Facing Dog (Urdhva Mukha Svanasana)
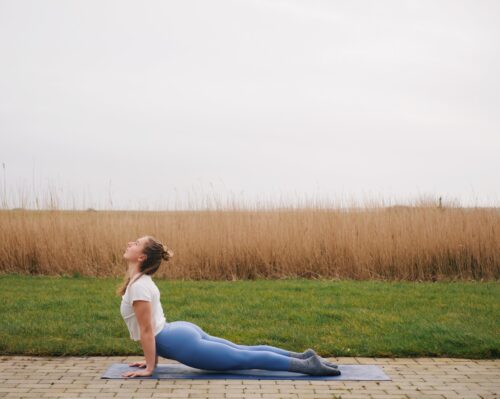
This is a great pose when performed with strength and integrity. But it can also be a pose that gives a lot of people problems in the long run since it’s easy to forget about engaging to protect the lower back, when we’re moving so quickly through it when doing sun salutations and other yoga flows that we can end up dumping into our lower back repetitively, which can lead to strain or injury (let’s avoid that, shall we?).
How to do upward dog pose:
Lie on the ground with your belly down. Stretch your legs back, tops of the feet on the floor. Spread your hands on the floor under your shoulders. Start extending your elbows and imagine your palms pulling backwards, this will engage your back and pull your shoulders down and back to lift your chest forward in between your arms. Push the tops of your feet into the ground to lift your hips up off the ground. Keep your glutes and inner thighs engaged. Look forward and keep the back of your neck long (no need to crank the head back).
Downward Facing Dog (Adho Mukha Svanasana)
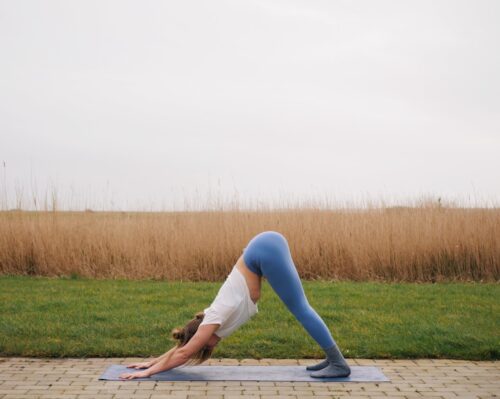
Downward facing dog (or down dog) is great. At least when you’ve practiced yoga for a little while. In the beginning it can feel like everything in your body is stretched and tense and you might wonder how this could ever be used as a resting pose in some yoga classes. I promise you, it get’s so much better with practice!
How to do downward facing dog pose:
Starting on your hands and knees in a tabletop position and bring your hands slightly forwards of your shoulders. Tuck your toes under and lift your knees off the floor. At first keep the knees slightly bent and the heels lifted away from the floor as you find length in your lower back. Lift the sitz bones (sitting bones) toward the ceiling. Create a spiral action in your arms by rolling your upper arms away from you and your forearms spiralling inwards (external rotation of the shoulder joint). You can start to straighten the legs and lower your heels toward the ground, but keep the knees bent if you feel your back rounding to make it possible (as your hamstrings get more flexible, you’ll be able to straighten the legs more).
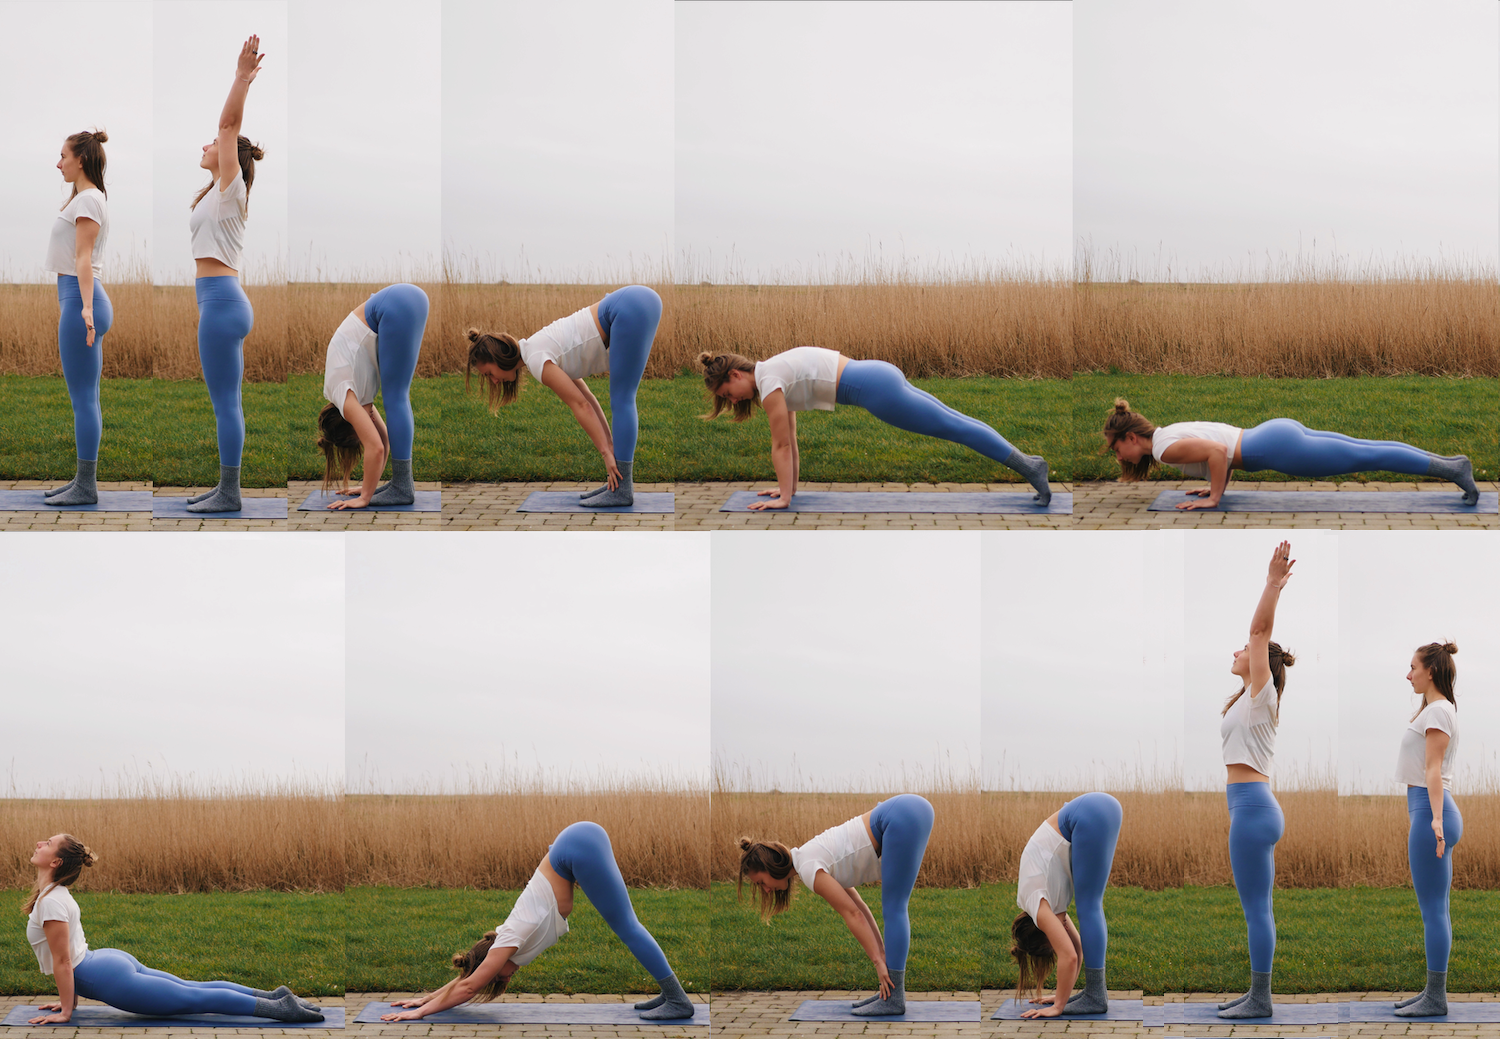
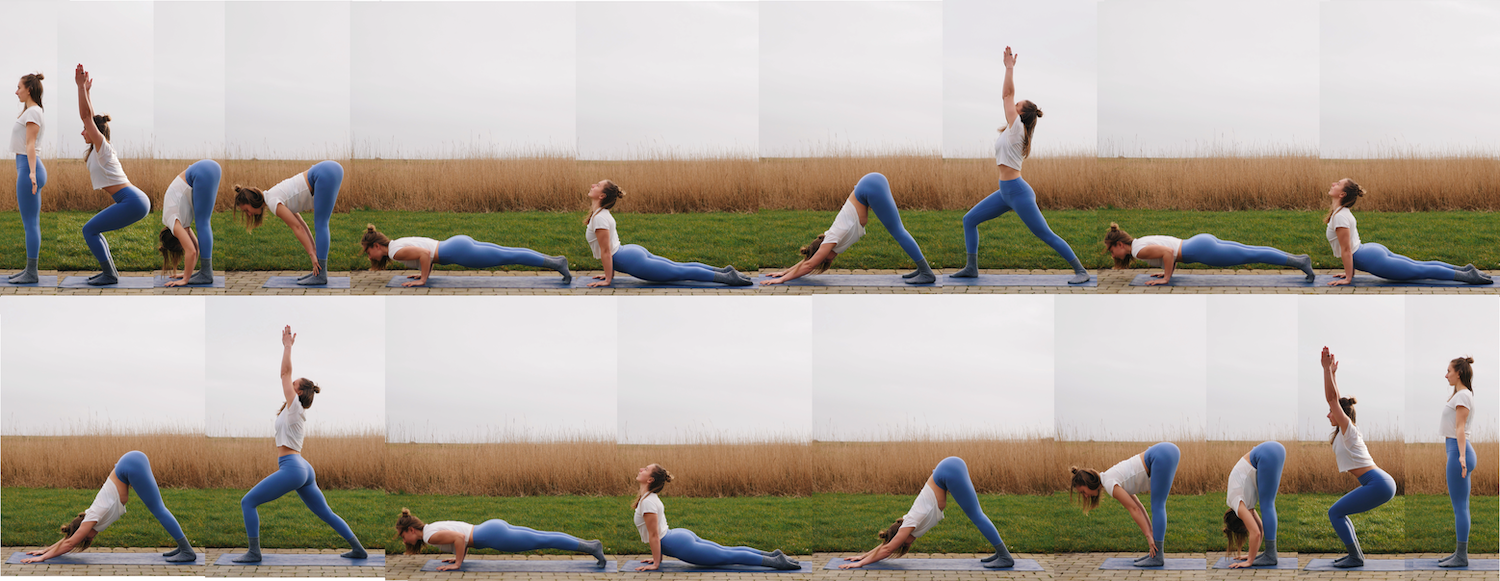
Flowing through the sun salutations
The Classical Sun Salutation
This is a brilliant sun salutation to start with when you brand new to yoga or you’ve practiced for less than a year. Poses like the cobra and knees-chest-chin are great poses to learn to build a solid foundation of strength before practicing Surya Namaskar’s upward-facing dog and chaturanga dandasana, which require more strength and flexibility to practice comfortably.
In classical sun salutations you do one round leading with the right foot and one round leading with the left foot. Here’s an overview of how the classical sun salutation is practiced (with breath cues added to each pose):

I’ve included plank pose in the sequence for clarity. If you’re first starting out, you can add in an exhale as you move into plank pose, pause and inhale in plank, then continue the rest of the sequence with the regular breath counts. Eventually you’ll be able to move with ease through plank pose without stopping to take an extra round of breath.
Surya Namaskar A
Surya Namaskar A is the shortest of the sun salutations since it doesn’t include any asymmetric poses like Warrior I or high lunge. It’s a nice way to move between standing at the top of the mat in mountain pose and downward facing dog that I often use in my flows.
Overview of the Surya Namaskar A:
Surya Namaskar B
Surya Namaskar B is my favourite sun salutation to build more creative sequences from. You do both sides of Warrior I in one round, so there’s not the same struggle of remembering which side you’re on like there can be when doing the classical sun salutation.
Overview of the Surya Namaskar B:
The breath
Maybe you’ve noticed a pattern of how to use the breath in yoga? The general trend is that any expansive or lengthening pose is linked to an inhale, whilst any pose where you’re closing in or rounding is linked to an exhale. The breathing is in through the nose and out through the nose. Sometimes more experienced practitioners add a little constriction in the through so their breath becomes audible (the breath kind of sounds like a crashing wave or darth vader) called ujjayi breathing.
The drishti (gaze)
In some styles of yoga there is not only a set breathing pattern with each pose, there’s also a set focal point. Don’t worry about it just yet if you’re completely new to yoga and just trying to learn the sun salutations by heart.
If you’re familliar with the sun salutations already however, it can be a nice extra point of focus to add the drishti to each posture. In ashtanga yoga is supposed to be on one set point such as the tips of the fingers, the navel, the toes, the side, upwards, etc. I’ve spoken to ashtangi yogis who say it gives them one more anchor point to come back to that will keep their awareness in the present moment when the monkey mind wants to take over.
I never really got into using drishtis in my yoga practice because I don’t normally practice set sequences of poses but if it sounds helpful to you, I encourage you to try it out!
What does it mean to take a vinyasa?
Sometimes the yoga teacher in class will say “move through a vinyasa” or “take a vinyasa”. It means to move through a plank, lower down to knees-chest-chin or chaturanga, lift to a cobra or upward facing dog and then end in a downward facing dog. Vinyasa yoga means linking breath and movement, so that’s why taking a vinyasa means to move through a small sequence of poses linked to the breath.